
URL Redirect with Amazon CloudFront and Amazon Route 53
A URL redirect, also called URL forwarding, allows you to make a web page available under more than one URL. When a web browser attempts to open a URL that has been redirected, a page with a different URL is opened. This is also indicated in the web browser itself by showing the new URL in the navigation bar. As an example: You might enter the URL https://about.example.com into the browser and be redirected to https://www.example.com/about/.
While often misunderstood as a function or DNS, a URL redirect is actually a function of HTTP and therefore of a web server. Therefore if we want to implement such a redirect, we need a web server to perform such a URL redirect.
This blog post shows you how to use Amazon CloudFront, the content delivery network (CDN) of AWS, to perform such a redirect.
Background
How does a URL redirect work
While a URL redirect mainly uses the Hypertext Transfer Protocol (HTTP), the Domain Name System (DNS) naturally also plays a role when using HTTP. In order to understand what we need to configure it’s a good idea to understand the flow between these two protocol when it comes to a URL redirect.
Consider Figure 1, which displays the conceptual overview of a redirect from https://www.example.com to https://www.example.org. The end-user will here initially enter https://www.example.com into the browser, but be redirected to https://www.example.org and displayed that website’s content.
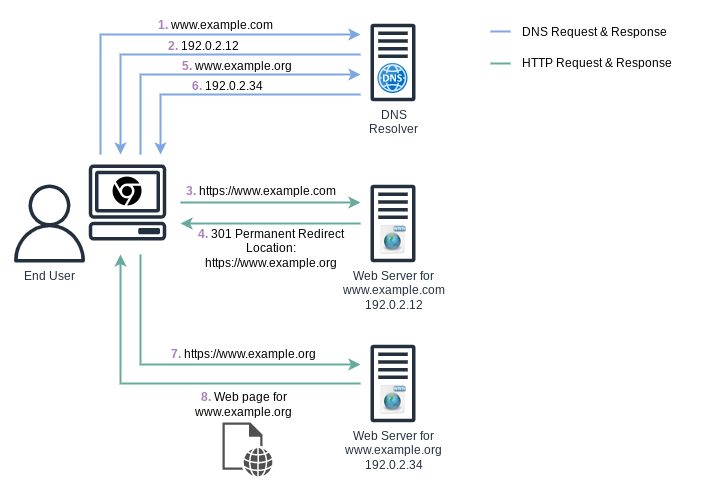
Let’s have a look the involved steps:
- The browser performs a DNS lookup for
www.example.com. - The local DNS resolver responds with the IP address for
www.example.com. Note, that the recursive behavior of the DNS resolver is not depicted here, to keep the example simple. - The browser performs an HTTP “GET” request against te web server for
www.example.com, using the IP address it just received. - The web server for
www.example.comresponds with a “301 Permanent Redirect” response, also delivering the new location ashttps://www.example.orgvia HTTP. - The browser performs a DNS lookup for
www.example.org. The new URLhttps://www.example.orgis also displayed in the browser’s address bar. - The local DNS resolver responds with the IP address for
www.example.org. Again, the recursive behavior of the DNS resolver is not depicted. - The browser performs an HTTP “GET” request against the web server for
www.example.org, using the IP address it just received. - The web server for
www.example.orgresponds with the actual data for this website.
Host header and Server Name Indication (SNI)
Sometimes the question comes up why it is not sufficient to just configure a Canonical Name (CNAME) record in DNS instead of a full URL redirect.
Imagine you want to allow your company’s users to access the AWS Console under https://aws.mycompany.com instead of https://console.aws.amazon.com. Why isn’t it enough to create a CNAME in the DNS zone of mycompany.com that points to console.aws.amazon.com?
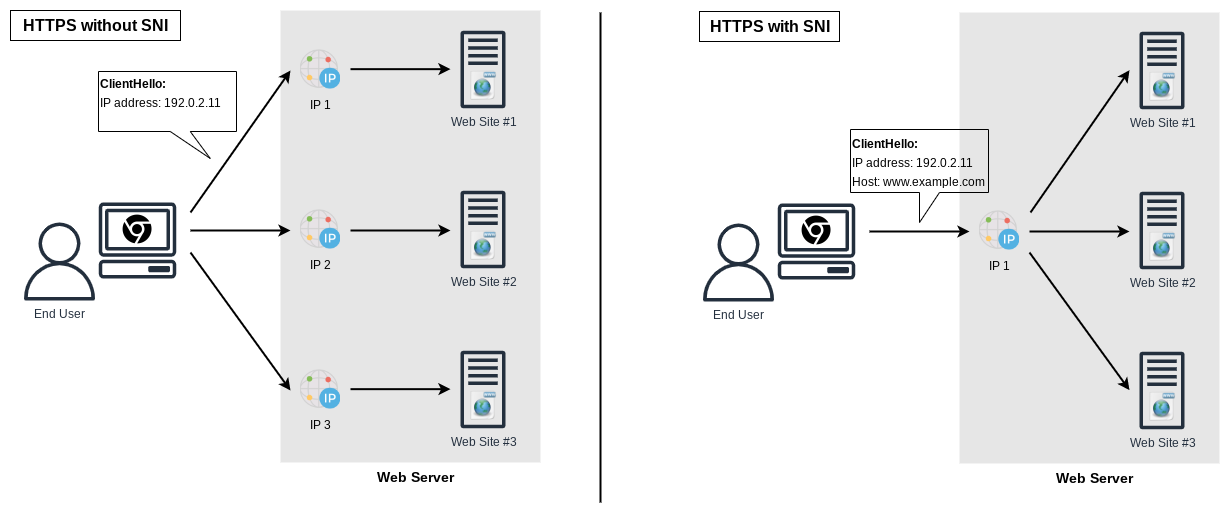
For this we have to look back at the early days of HTTP with its first version of HTTP/1.0. This version neither included the ability of “Host” headers, nor Server Name Indication (SNI), which is necessary to use “Host” headers with TLS. With this HTTP version, each webserver required a unique IP address for each site it was hosting (See Figure 2).
This is obviously very inefficient with regards to IP address usages and issues such as the IPv4 address exhaustion forced the need for solutions. To do so, HTTP/1.1 introduced the concept the “Host” header, where the client indicates to the server the hostname of the actual website it wants to access. This allows to host multiple different websites with different hostnames on the same web server with the same IP address.
With the Hypertext Transfer Protocol Secure (HTTPS) becoming more common, this concept had to be extended as any of the request headers - from the client to the server - which includes the “Host” header are part of the TLS encryption. Therefore the web server was in a “catch 22” situation, where it needed to know the website being targeted so that it could pick the right certificate without looking at the HTTP session data. That’s where Server Name Indication (SNI) comes into the picture and allows the browser to indicate which hostname it wants to talk to (Figure 2).
What does all of that have to do with our CNAME? Today use of SNI and Host headers is the norm and as such the web server that delivers the website for https://console.aws.amazon.com expects to see that hostname as part of the SNI handshake. Any other hostname will be rejected for security reasons.
But creating a CNAME from https://aws.mycompany.com to https://console.aws.amazon.com and subsequently entering https://aws.mycompany.com into the browser would do exactly this: It would attempt to talk to the web server for https://console.aws.amazon.com, while including https://aws.mycompany.com in the SNI. Therefore the web server for https://console.aws.amazon.com will prevent this communication.
Example use case
For this blog post we will use an example to demonstrate the power of URL redirects. You can see that this blog site has main navigation elements in the upper right corner. Besides the item “Home”, which will bring you back to the Homepage, there are also items for “AWS”, “IPv6”, “Tags”, and “About”, which will directly bring you to certain pages.
What if we could add the following URLs that will bring you to the same pages:
https://aws.edge-cloud.nethttps://ipv6.edge-cloud.nethttps://tags.edge-cloud.nethttps://about.edge-cloud.net
Each of these URL will be a redirect to the main page at https://www.edge-cloud.net/<target>, where <target> matches the current URI for that item.
CloudFront for URL redirect
Let’s setup an example to showcase a URL redirect with Amazon CloudFront as the web server and Amazon Route 53 for the DNS records.
Cloudfront distribution and dummy origin
As a first step we will create a new CloudFront distribution.
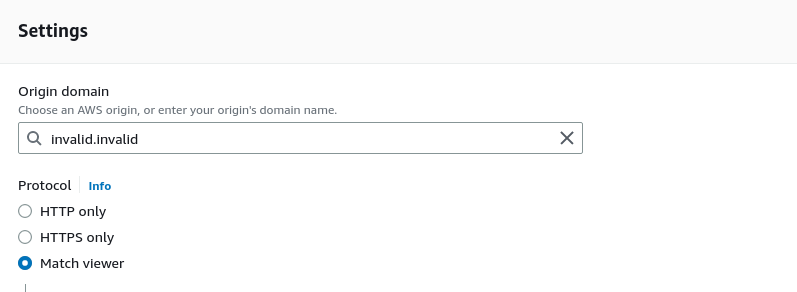
One of the items that you need to specify when creating a CloudFront distribution is the origin domain or the source of the content that will be served by CloudFront. In our case we have no such origin and no actual objects will ever be served. Therefore it’s safe to enter the origin domain invalid.invalid, while choosing the Protocol as Match viewer (See Figure 3).
All other settings can remain as default for now.
Certificates and CNAMEs
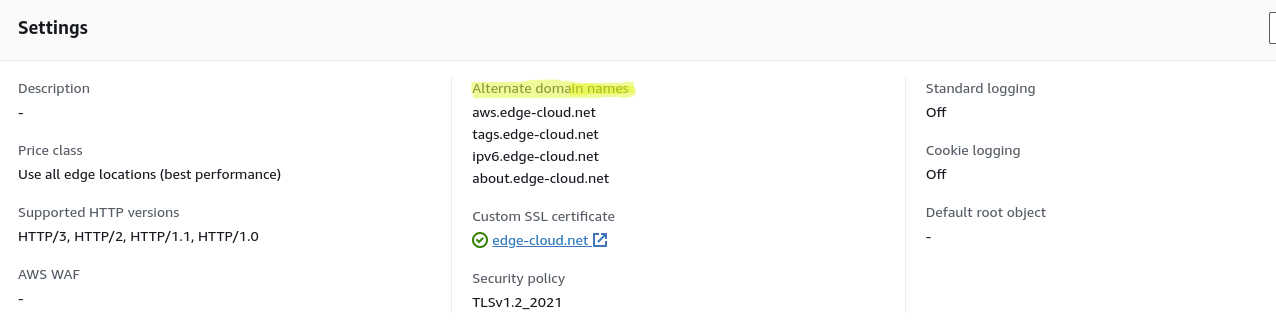
Next we need to configure the new CloudFront distribution for alternate domain names.
As a first step this means using ideally AWS Certificate Manager to create a wildcard certificate for *.edge-cloud.net. As an alternative we could create a Subject Alternative Name (SAN) certificate for just the four hostnames.
Next, we will add the certificate and the alternate domain names to the CloudFront distribution (See Figure 4).
CloudFront function
Now it’s time for the actual magic: The logic to execute in CloudFront and perform the URL redirect. For this CloudFront offers “CloudFront Functions”. With CloudFront Functions, you can write lightweight functions in JavaScript for high-scale, latency-sensitive CDN customizations. In our case that customization will be returning a “301 Permanent Redirect”.
Start by creating the CloudFront function via the AWS Console (See Figure 5).
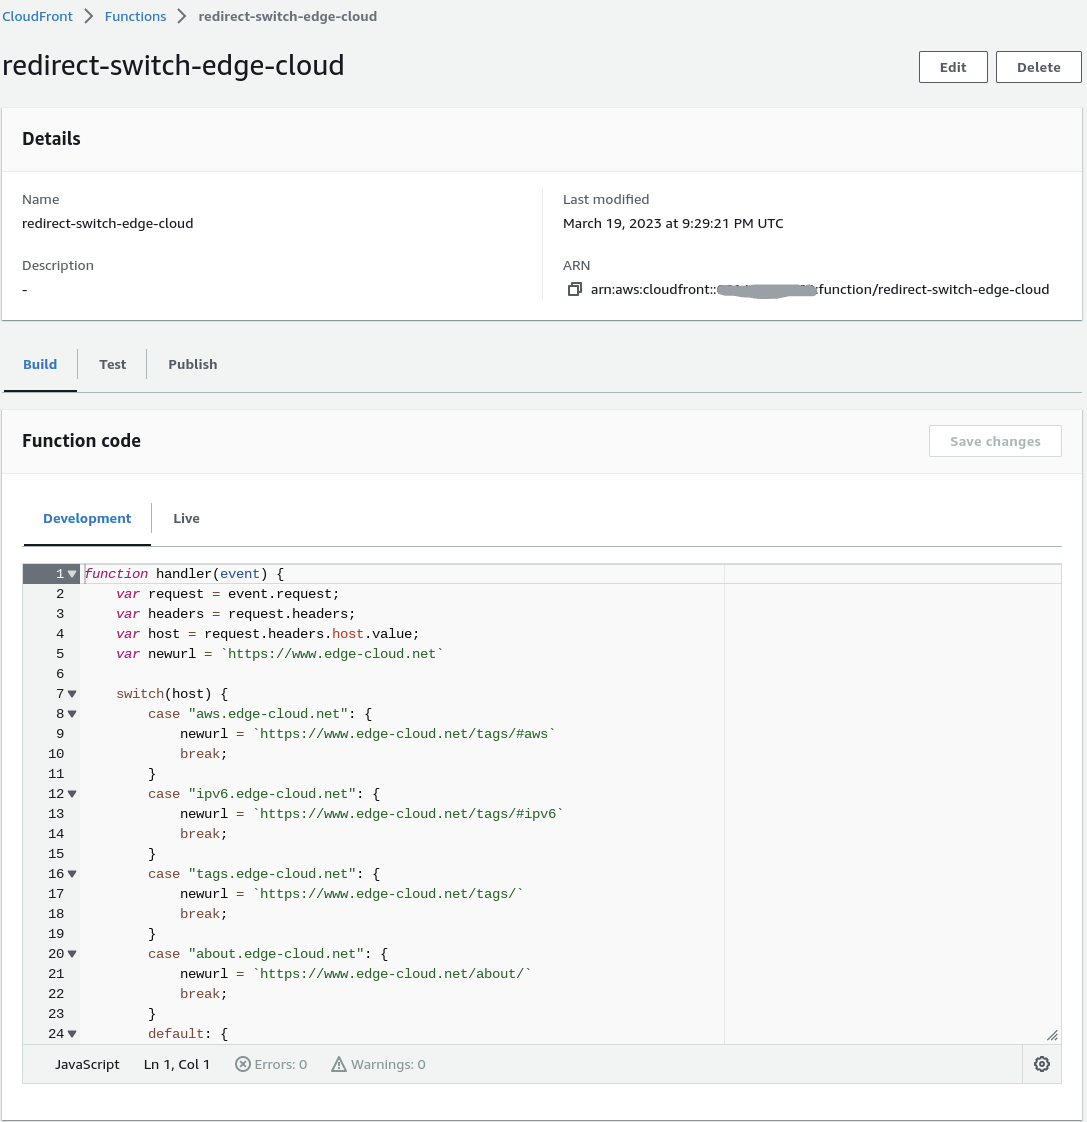
Below is the actual CloudFront Functions code. It extracts the host header value from the request and performs a “switch” based on the value of the found header, assigning the target URL for each expected host header value. Next the function responds with a redirect, using the status code “301” for permanent redirect and the response header “location” to indicate the new URL.
#
# Amazon CloudFront function for selective URL redirect
#
function handler(event) {
    var request = event.request;
    var headers = request.headers;
    var host = request.headers.host.value;
    var newurl = `https://www.edge-cloud.net` // Default value for redirect target

    switch(host) {
        case "aws.edge-cloud.net": {
            newurl = `https://www.edge-cloud.net/tags/#aws`
            break;
        }
        case "ipv6.edge-cloud.net": {
            newurl = `https://www.edge-cloud.net/tags/#ipv6`
            break;
        }
        case "tags.edge-cloud.net": {
            newurl = `https://www.edge-cloud.net/tags/`
            break;
        }
        case "about.edge-cloud.net": {
            newurl = `https://www.edge-cloud.net/about/`
            break;
        }
        default: {
            break;
        }
    }

    var response = {
        statusCode: 301,
        statusDescription: 'Moved Permanently',
        headers:
            { "location": { "value": newurl } }
    }

    return response;
}
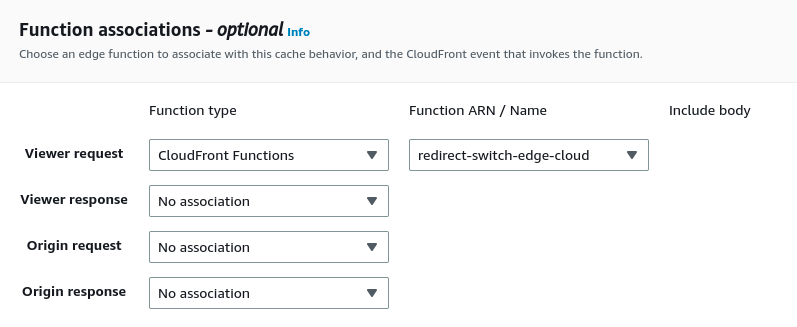
After publishing the above CloudFront Function, return to the CloudFront distribution that we initially created and update the viewer request with this CloudFront function (See Figure 6).
DNS setup with Route 53
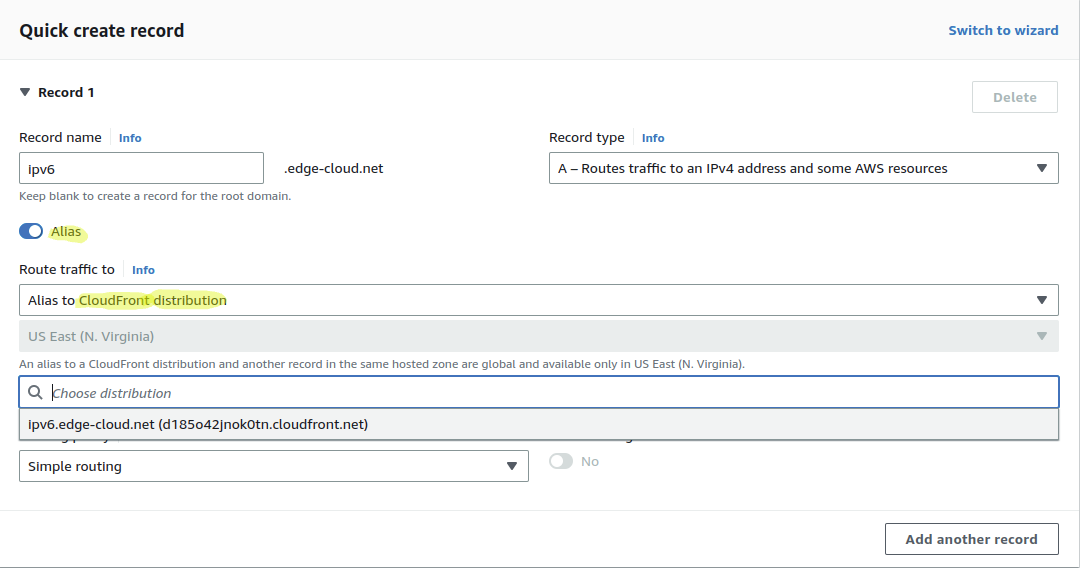
As a last step we have to setup the DNS records in Amazon Route 53 for the host names aws.edge-cloud.net, ipv6.edge-cloud.net, tags.edge-cloud.net, and about.edge-cloud.net. To do so, we will create an Alias records with the above CloudFront distribution as the target (See Figure 7). Create both an “A” record for IPv4 and an “AAAA’ record for IPv6 for each of the host names. Thereby we need to create a total of 8 DNS records.
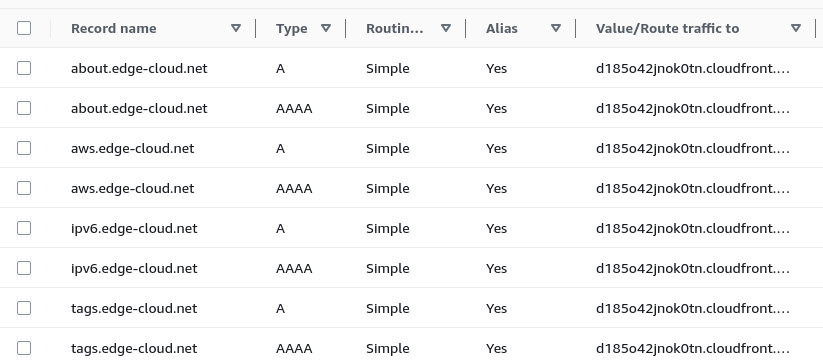
As a final result we should see the 8 entries for the host names aws.edge-cloud.net, ipv6.edge-cloud.net, tags.edge-cloud.net, and about.edge-cloud.net as an Alias record (See Figure 8).
Testing the setup
Let’s test our URL redirect with the Curl command. curl -sS -D - https://aws.edge-cloud.net -o /dev/null.
The output will look as follows:
ubuntu@ubuntu:~$ curl -sS -D - https://aws.edge-cloud.net -o /dev/null
HTTP/2 301
server: CloudFront
date: Mon, 20 Mar 2023 23:27:50 GMT
content-length: 0
location: https://www.edge-cloud.net/tags/#aws
x-cache: FunctionGeneratedResponse from cloudfront
via: 1.1 f6e2aa8788731292478df0dab2377dd8.cloudfront.net (CloudFront)
x-amz-cf-pop: AKL50-C1
alt-svc: h3=":443"; ma=86400
x-amz-cf-id: MVmSx7lhwJ8IcXqcv-sPZb1CD2kYB8GHjWKWlcHYs__EiWtqd25Dcg==
The key lines to look for are:
- The response in the first line, with the HTTP/2 status code of “301” indicating a permanent redirect
- The “location” line, which shows the target URL of the redirect.
That’s it. Everything is working as expected.
Summary
This blog post walked you through utilizing Amazon CloudFront with CloudFront functions to perform a URL redirect.
Leave a comment