
Hands-on with AWS Bring your own IP addresses (BYOIP) in Amazon EC2
This blog post will walk you through the Bring your own IP addresses (BYOIP) for Amazon EC2 feature, using a real-life example. With BYOIP you can bring part or all of your publicly routable IPv4 or IPv6 address ranges to your AWS account. While you continue to own the address range, AWS advertises it on the internet for you under the Amazon Autonomous System Numbers (ASNs). Within your AWS account, these BYOIP address ranges appear as an address pool.
YouTube Video: The content presented here is also available as a YouTube video.
While other blog posts on AWS BYOIP exist, they are usually completely theoretical, using Documentation IP ranges and thereby hard to follow. In this blog post I will use real IPv6 address space instead, allowing you to validate most of the steps through various publicly available databases and systems yourself.
Benefits
You might wonder what the benefits of using BYOIP for Amazon EC2 is. They include among others:
- Trusted IP space: You might be using trusted IP space for your service, such as a transactional e-Mail service that requires a high reputation of IP space, or a VPN service.
- Avoid blocking of IP space: AWS publishes its current IP address ranges in JSON format, which makes it very easy for various content or service provider to block all of this address space. This often happens for unknown or unclear reasons. Address space used for BYOIP is not published via this JSON file.
- Hard-coded IP addresses: There is a wide set of devices in the field that might be using hard-coded IP addresses to contact a service instead of relying on DNS. Therefore when moving such a service to AWS, it is often necessary to move the corresponding IP address and its IP block along to AWS. Most frequently this proves easier than updating hundreds if not thousands of devices in the field.
Requirements
The AWS documentation lists various requirements for using BYOIP. One key requirement is to be able to demonstrate “control” over the IP space in question.
It’s widely recognized within the Internet community that you can demonstrate sufficient control over IP address space for the purpose of announcement from another ASN, by being able to create the corresponding Route Origin Authorization (ROA) record. Later within the process you will see how you can demonstrate control over your IP space by creating the necessary ROA record.
Overall process
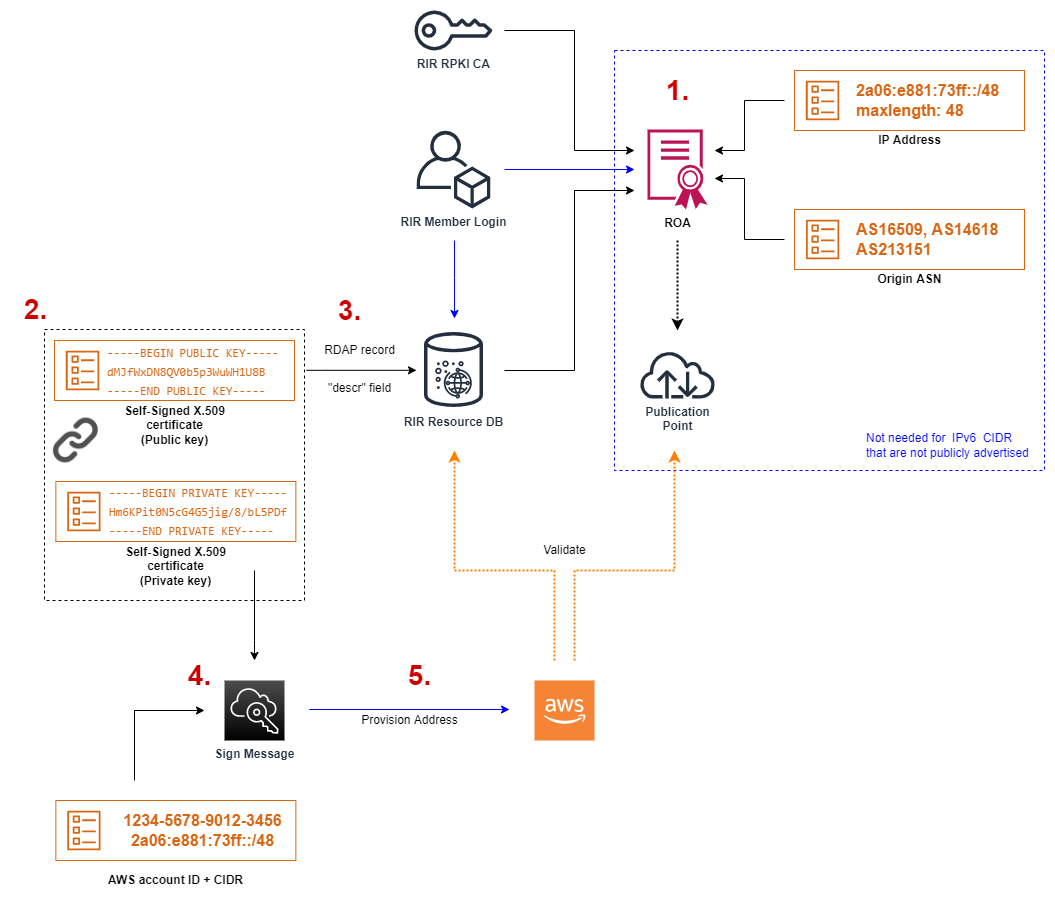
The overall process to bring IPv4 or IPv6 address space to AWS via the BYOIP process consists of multiple steps and is outlined in figure 1.
-
Step 1: Configuration of IP address space via your RIR/LIR - This includes creating appropriate RIR Resource DB records (aka. “Allocation” in the case of RIPE), as well as a Route Origin Authorization (ROA) record. This step represents good hygiene when using IP address space in general. Creation of a ROA record is only necessary for IPv4 address space and publicly advertised IPv6 address space.
-
Step 2: Preparation of Self-signed X.509 certificates - While ROA is used to demonstrate control over the IP address space, it cannot be used to match a particular IP space to a certain AWS account ID. This is done via steps 2 - 5, whereas Step 2 generates a self-signed X.509 certificate pair for later usage.
-
Step 3: Uploading the public key to the RIR Resource DB (RDAP record) - Placing the public key portion of the self-signed X.509 certificate into the description field of the IP address space’s RDAP record allows AWS to validate the mapping of the corresponding address space to an AWS account. This approach assumes that only someone with control over the IP address space can make changes to the corresponding RIR Resource DB record.
-
Step 4: Creating a signed message - In this step you tie the IP address space to a certain AWS account ID. This is done by creating a signed message that by itself creates information about the IP address space and the AWS account ID and is signed using the above mentioned self-signed X.509 certificates.
-
Step 5: Provision and adverstise address space - The signed message from step 4 is used to request the provisioning of the IP address space within the AWS Virtual Private Cloud (VPC) services. AWS validates the request against the RIR Resources DB and the RPKI publication point to ensure that you have sufficient control over the space. As a last item - which is only necessary for IPv4 address space and publicly advertised IPv6 address space - the IP address space is advertised via BGP to the Internet from the selected AWS region.
Onboarding your BYOIP space
Step 1: Configuration of IP address space via your RIR/LIR
In this blog post I will use IPv6 space allocated by my Local Internet Registry (LIR) SnapServ from the Regional Internet Registry (RIR) RIPE NCC.
RIPE policy (IPv4, IPv6) states that any IP address sub-block that is used in a different network must be sub-allocated by the RIR or assigned by the end-user within the RIPE database.
For this particular example we will focus on the red circle in Figure 2:

As mentioned before all these IPv6 prefixes are real and you can follow along the process by checking yourself what is published via the RIPE DB.
RIR Assignment
While the /40 block of 2a06:e881:7300::/40 with the status “Allocated-By-LIR” already exists at this point, I need to create a new assignment for the /48 block of 2a06:e881:73ff::/48 with the status “Assigned” to fulfill the RIPE policy.
Without going into full details of how to document IPv6 assignments in the RIPE database, or what attributes the inet6num object can include, the resulting inet6num object in RPSL format will look like this:
inet6num:       2a06:e881:73ff::/48
netname:        EU-CHRISTIANELSEN-AWS
country:        EU
admin-c:        CE2932-RIPE
tech-c:         CE2932-RIPE
status:         ASSIGNED
mnt-by:         Christian_Elsen-MNT
source:         RIPE
For now we have merely created this inet6num object in the RIPE database for documentation purposes and to fulfill the RIPE policy. Later on you’ll see that we will come back to this object and update it with the self-signed X.509 certificate.
Resource Public Key Infrastructure (RPKI)
Next we need to create a Route Origin Authorization (ROA), a cryptographically signed object that states which Autonomous System (AS) is authorized to originate a particular IP address prefix.
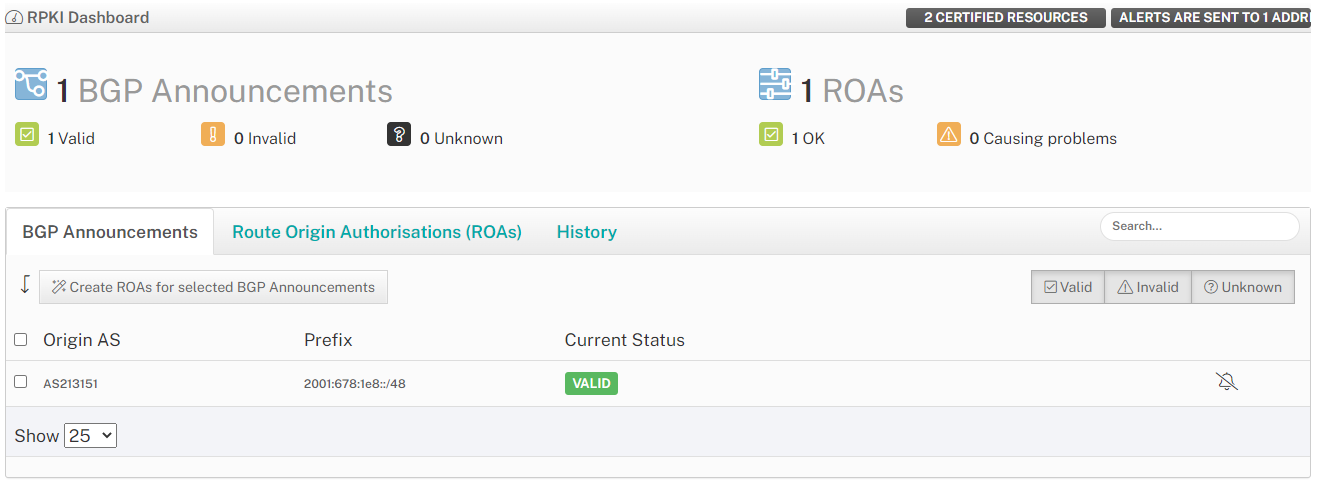
For address objects with the status of “Assigned PI” for Provider Independent (See Figure 2), one would accomplish this via the Regional Internet Registry (RIR). In my case that would be the RIPE RPKI Dashboard and look like depicted in Figure 3.
But you’ll remember from above that for this post I’m not using a Provider Independent IP block, but rather an IPv6 block in the “Assigned” state. Therefore I have to turn to my LIR in order to create the ROA. Luckily my LIR provides a web interface to accomplish this task (See Figure 4).
This allows me to create two ROA entries to map the /48 prefix in question to both the origin ASN of AS14618 and AS16509. As the prefix is a /48 , selecting a “Maximum Length” of 48 for the ROA object is the only choice.
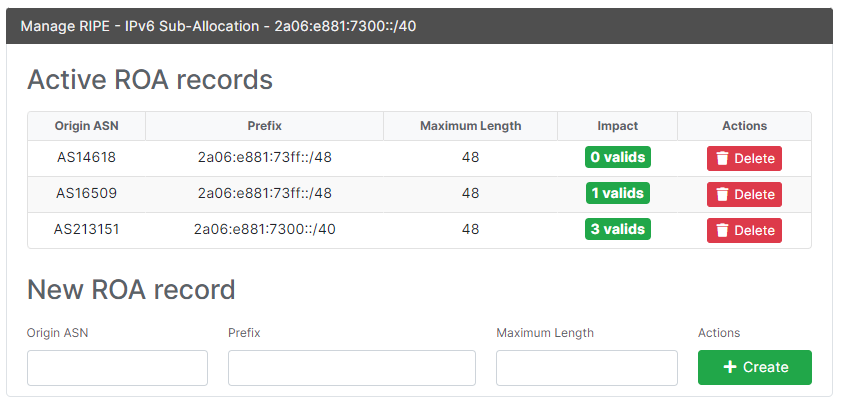
AWS recommends to create a ROA object for both AS14618 - which is used for the US-East-1 (N.Virginia) region - as well as AS16509 - which is used for all other commercial AWS regions. If you want to use BYOIP with GovCloud (US) select AS8987 in your ROA object instead.
Notice: In this example, where I only want to bring the /48 block of 2a06:e881:73ff::/48 to AWS via BYOIP, The ROA entry is created for this particular /48 only along with the only possible “Maximum Length” size of 48. If I were to bring multiple /48 blocks over to AWS via BYOIP - e.g. for additional AWS regions - I could also create a single ROA entry for the “parent block” - which would be the /40 block of 2a06:e881:7300::/40 - instead of each individual /48 block. In this case the “Maximum Length” still needs to be set to 48 as each individual block would be a /48.
Step 2: Preparation of Self-signed X.509 certificates
Next we need to create a self-signed X.509 certificate, for which the AWS documentation provides the necessary steps using OpenSSL on a Linux based system. A quick and easy way to get access to such a Linux based system is to use AWS CloudShell in one of the supported AWS Regions. In this demo I’ll be using the EU-Central-1 (Frankfurt) region (See Figure 5).
While AWS CloudShell does not provide OpenSSL out of the box, it can be installed quickly and easily via sudo yum -y install openssl.
The result will look like this:
[cloudshell-user@ip-10-1-2-3 ~]$ sudo yum -y install openssl
Loaded plugins: ovl, priorities
Resolving Dependencies
--> Running transaction check
---> Package openssl.x86_64 1:1.0.2k-24.amzn2.0.3 will be installed
--> Finished Dependency Resolution

Dependencies Resolved

==================================================================================================================================================================================================================================================
 Package                                               Arch                                                 Version                                                                Repository                                                Size
==================================================================================================================================================================================================================================================
Installing:
 openssl                                               x86_64                                               1:1.0.2k-24.amzn2.0.3                                                  amzn2-core                                               496 k

Transaction Summary
==================================================================================================================================================================================================================================================
Install  1 Package

Total download size: 496 k
Installed size: 830 k
Downloading packages:
openssl-1.0.2k-24.amzn2.0.3.x86_64.rpm                                                                                                                                                                                     | 496 kB  00:00:00
Running transaction check
Running transaction test
Transaction test succeeded
Running transaction
  Installing : 1:openssl-1.0.2k-24.amzn2.0.3.x86_64                                                                                                                                                                                           1/1
  Verifying  : 1:openssl-1.0.2k-24.amzn2.0.3.x86_64                                                                                                                                                                                           1/1

Installed:
  openssl.x86_64 1:1.0.2k-24.amzn2.0.3

Complete!
Next we can generate the private key via openssl genpkey -aes256 -algorithm RSA -pkeyopt rsa_keygen_bits:2048 -out private-key.pem, which will then look like this as a result.
[cloudshell-user@ip-10-1-2-3 ~]$ openssl genpkey -aes256 -algorithm RSA -pkeyopt rsa_keygen_bits:2048 -out private-key.pem
...................+++
..........................................+++
Enter PEM pass phrase:
Verifying - Enter PEM pass phrase:
[cloudshell-user@ip-10-1-2-3 ~]$ ls
private-key.pem
[cloudshell-user@ip-10-1-2-3 ~]$
Next we have to create the corresponding public certificate with openssl req -new -x509 -key private-key.pem -days 365 | tr -d "\n" > certificate.pem. None of the values asked for “Country Name” through “Common Name” or “Email Address” matter and can be randomly chosen.
The result will look like this:
[cloudshell-user@ip-10-1-2-3 ~]$ openssl req -new -x509 -key private-key.pem -days 365 | tr -d "\n" > certificate.pem
Enter pass phrase for private-key.pem:
You are about to be asked to enter information that will be incorporated
into your certificate request.
What you are about to enter is what is called a Distinguished Name or a DN.
There are quite a few fields but you can leave some blank
For some fields there will be a default value,
If you enter '.', the field will be left blank.
-----
Country Name (2 letter code) [XX]:NZ
State or Province Name (full name) []:
Locality Name (eg, city) [Default City]:Auckland
Organization Name (eg, company) [Default Company Ltd]:Edge-Cloud
Organizational Unit Name (eg, section) []:
Common Name (eg, your name or your server's hostname) []:AWS-BYOIP
Email Address []:
[cloudshell-user@ip-10-1-2-3 ~]$
Notice: Due to the parameter -days 365 the public certificate will have a validity of 365 days. The certificate will only be used during the initial provisioning steps for an IP range. You might want to place the certificate into the parent block of an IP range - e.g. the the /40 block of 2a06:e881:7300::/40 in my case - in order to later bring additional IP ranges to AWS, e.g. for additional regions. In this case make sure you don’t loose the corresponding private key within your AWS CloudShell and keep an eye on the expiration date of the certificate. The ROA on the other hand has to remain in place!
Step 3: Uploading the public key to the RIR Resource DB (RDAP record)
Next we need to upload the resulting public certificate from above into the RIR resource data base as an RDAP record. In the case of RIPE - which is the RIR that we are using for this example - the public certificate has to be placed into the “descr” field of the address range.
Notice: In this example, where I only want to bring the /48 block of 2a06:e881:73ff::/48 to AWS via BYOIP, I will place it within this address ranges RIR record. If I were to bring multiple /48 blocks over to AWS via BYOIP - e.g. for additional AWS regions - I could also place the public certificate into the “parent block” which would be the /40 block of 2a06:e881:7300::/40 in this case.
First we will grab the content of the public certificate via the command cat certificate.pem.
The result will look like this:
[cloudshell-user@ip-10-0-76-195 ~]$ cat certificate.pem
-----BEGIN CERTIFICATE-----MIIDyTCCArGgAwIBAgIUR2P0aLZtfm2L9QZI5muMqtCQcM0wDQYJKoZIhvcNAQELBQAwdDELMAkGA1UEBhMCREUxCzAJBgNVBAgMAkhFMRIwEAYDVQQHDAlGcmFua2Z1cnQxFTATBgNVBAoMDEFTMjEzMTUxIExMQzEMMAoGA1UECwwDTk9DMR8wHQYJKoZIhvcNAQkBFhBub2NAYXMyMTMxNTEubmV0MB4XDTIxMDgzMTIxNTg1MFoXDTIyMDgzMTIxNTg1MFowdDELMAkGA1UEBhMCREUxCzAJBgNVBAgMAkhFMRIwEAYDVQQHDAlGcmFua2Z1cnQxFTATBgNVBAoMDEFTMjEzMTUxIExMQzEMMAoGA1UECwwDTk9DMR8wHQYJKoZIhvcNAQkBFhBub2NAYXMyMTMxNTEubmV0MIIBIjANBgkqhkiG9w0BAQEFAAOCAQ8AMIIBCgKCAQEAuVeZfmkEPM2Oh5K9vISgoBFJP/xuCrZE81VTErGjrPAeXfQaKXJzTf4xL4QZPBJmAbtSD91d4ubGEwVv8FIH8vg712opgLefMDYwv1SoAV0YUG0C23Zadm31MHOWtYX/KgEXOtUkAUuL8QEUH2fgU/6F+0PEBWC985zKTCMxEu2GmyEdjPT0dcun2F/eLFaEjtkZ5Il+ruhoN9grhBWWqau4DG0EyBnkARSmB8zpqSFte6IO+XypSpEglc3792xnLQFVUc1N7jynIMXXIf9fnPKP87jTcxmyDszFfguC9nsdmSDB9VMe3rnnJmDN13nkGWWgtve0grM8yULBb93IwIDAQABo1MwUTAdBgNVHQ4EFgQUaLbwp0B6sJR9bhlQOAFE9Ts/BKkwHwYDVR0jBBgwFoAUaLbwp0B6sJR9bhlQOAFE9Ts/BKkwDwYDVR0TAQH/BAUwAwEB/zANBgkqhkiG9w0BAQsFAAOCAQEAIbvgfqQgCDkKi35Gj0St0aOk1+h8iOdqrW3/JXvNUsIRJJcPpwJyA/kBOuy64YWc9kk7lod+TxFXdMZiUKUFKJtC5FDY2RaR5YpstLNG/+T19ydNLjPQ2WBrUqUyCL9T195/TmZ437k/Rg1VMGisHPlLrOON8IPFg/G3Xy/9fTEQIIZczWlWAprtxacgCMHgZvr31vDEgSNbJux6s+P8YZA7j8M2GclAX13gtim9IeTGgQTjRX9YtlGSP8hHj9vVIxktyyJFF9PphMjlEKuNvlj5rG9YWjjqXUUPrhihlC53MmH7p1dtDKL63f3XAqJPTjJYvj7joBXz4evVVohjEg==-----END CERTIFICATE-----[cloudshell-user@ip-10-0-76-195 ~]$
Next we update the inet6num object for the /48 block of 2a06:e881:73ff::/48 with this certificate. Ensure to also include the ----BEGIN CERTIFICATE----- and -----END CERTIFICATE----- portions and not to include any newlines.
The resulting inet6num object in RPSL format will look like this:
inet6num:       2a06:e881:73ff::/48
netname:        EU-CHRISTIANELSEN-AWS
country:        EU
admin-c:        CE2932-RIPE
tech-c:         CE2932-RIPE
status:         ASSIGNED
descr:          -----BEGIN CERTIFICATE-----MIIDyTCCArGgAwIBAgIUR2P0aLZtfm2L9QZI5muMqtCQcM0wDQYJKoZIhvcNAQELBQAwdDELMAkGA1UEBhMCREUxCzAJBgNVBAgMAkhFMRIwEAYDVQQHDAlGcmFua2Z1cnQxFTATBgNVBAoMDEFTMjEzMTUxIExMQzEMMAoGA1UECwwDTk9DMR8wHQYJKoZIhvcNAQkBFhBub2NAYXMyMTMxNTEubmV0MB4XDTIxMDgzMTIxNTg1MFoXDTIyMDgzMTIxNTg1MFowdDELMAkGA1UEBhMCREUxCzAJBgNVBAgMAkhFMRIwEAYDVQQHDAlGcmFua2Z1cnQxFTATBgNVBAoMDEFTMjEzMTUxIExMQzEMMAoGA1UECwwDTk9DMR8wHQYJKoZIhvcNAQkBFhBub2NAYXMyMTMxNTEubmV0MIIBIjANBgkqhkiG9w0BAQEFAAOCAQ8AMIIBCgKCAQEAuVeZfmkEPM2Oh5K9vISgoBFJP/lxuCrZE81VTErGjrPAeXfQaKXJzTf4xL4QZPBJmAbtSD91d4ubGEwVv8FIH8vg712opgLefMDYwv1SoAV0YUG0C23Zadm31MHOWtYX/KgEXOtUkAUuL8QEUH2fgU/6F+0PEBWC985zKTCMxEu2GmyEdjPT0dcun2F/eLFaEjtkZ5Il+ruhoN9grhBWWqau4DG0EyBnkARSmB8zpqSFte6IO+XypSpEglc3792xnLQFVUc1N7jynIMXXIf9fnPKP87jTcxmyDszFfguC9nsdmSDB9VMe3rnnJmDN13nkGWWgtve0grM8yULBb93IwIDAQABo1MwUTAdBgNVHQ4EFgQUaLbwp0B6sJR9bhlQOAFE9Ts/BKkwHwYDVR0jBBgwFoAUaLbwp0B6sJR9bhlQOAFE9Ts/BKkwDwYDVR0TAQH/BAUwAwEB/zANBgkqhkiG9w0BAQsFAAOCAQEAIbvgfqQgCDkKi35Gj0St0aOk1+h8iOdqrW3/JXvNUsIRJJcPpwJyA/kBOuy64YWc9kk7lod+TxFXdMZiUKUFKJtC5FDY2RaR5YpstLNG/+T19ydNLjPQ2WBrUqUyCL9T195/TmZ437k/Rg1VMGisHPlLrOON8IPFg/G3Xy/9fTEQIIZczWlWAprtxacgCMHgZvr31vDEgSNbJux6s+P8YZA7j8M2GclAX13gtim9IeTGgQTjRX9YtlGSP8hHj9vVIxktyyJFF9PphMjlEKuNvlj5rG9YWjjqXUUPrhihlC53MmH7p1dtDKL63f3XAqJPTjJYvj7joBXz4evVVohjEg==-----END CERTIFICATE-----
mnt-by:         Christian_Elsen-MNT
source:         RIPE
Step 4: Creating a signed message
Now we can create our signed message that will tie the CIDR to be brought into AWS via BYOIP to the account ID under which it shall later live. As outlined in the AWS documentation, the format of the corresponding plain text message looks like 1|aws|<account>|<cidr>|<expiration date>|SHA256|RSAPSS
Assuming an AWS account id of 1234-5678-9012 and an expiration date of 1 year out from today - to give us enough time for the next steps - the resulting way to assign the plain text message would look like this:
[cloudshell-user@ip-10-1-2-3 ~]$ text_message="1|aws|123456789012|2a06:e881:73ff::/48|20220711|SHA256|RSAPSS"
[cloudshell-user@ip-10-1-2-3 ~]$ echo $text_message
1|aws|123456789012|2a06:e881:73ff::/48|20220711|SHA256|RSAPSS
[cloudshell-user@ip-10-1-2-3 ~]$
Next we will create the signed message using the command signed_message=$( echo -n $text_message | openssl dgst -sha256 -sigopt rsa_padding_mode:pss -sigopt rsa_pss_saltlen:-1 -sign private-key.pem -keyform PEM | openssl base64 | tr -- '+=/' '-_~' | tr -d "\n")
The result will look like this:
[cloudshell-user@ip-10-1-2-3 ~]$ signed_message=$( echo -n $text_message | openssl dgst -sha256 -sigopt rsa_padding_mode:pss -sigopt rsa_pss_saltlen:-1 -sign private-key.pem -keyform PEM | openssl base64 | tr -- '+=/' '-_~' | tr -d "\n")
Enter pass phrase for private-key.pem:
[cloudshell-user@ip-10-1-2-3 ~]$ echo $signed_message
Ncj8Yrm~6gbPuqDokOh9-tLsiCuMqzid5CxlseO87sRSG1DAhuz2RmL9Dw6TQA83lhiyhcLuHdiY34xojYxcFLHHHpona0l8Ul2MlkppehFP5qN11O4VlN78COzC37JqnuIqfngc~3juFY9u4Wt4qBqzAb08AzhaWf3v9Fu9qut5Hr3NRWtRaHfgeGvIYWZ2C864RvWPLEW6RmdXdHDojszcgxCfV-O5jCaafu8v~~m~vASq~-xOnlanqNsZ9D66l4r-MMLhYXccMyBgBKP3qhluR0FsQ~LfcBQbyEwEtS-wxWPG8~Dm9o67rkI19bVT16p~cGCBAQA17nefK3o-kw__
[cloudshell-user@ip-10-1-2-3 ~]$
Step 5: Provision and advertise address space
Provision the CIDR with an AWS region
Next we have to provision the above CIDR into the desired AWS region - here EU-Central-1 (Frankfurt).
This is done via the AWS CLI command aws ec2 provision-byoip-cidr --cidr <cidr> --cidr-authorization-context Message="$text_message",Signature="$signed_message" --region <region>. As AWS CloudShell has the AWS Command Line Interface (CLI) already installed no further preparation is necessary and the result will look like this:
[cloudshell-user@ip-10-1-2-3 ~]$ aws ec2 provision-byoip-cidr --cidr 2a06:e881:73ff::/48 --cidr-authorization-context Message="$text_message",Signature="$signed_message" --region eu-central-1
{
    "ByoipCidr": {
        "Cidr": "2a06:e881:73ff::/48",
        "State": "pending-provision"
    }
}
[cloudshell-user@ip-10-1-2-3 ~]$
It can take between minutes to days for the provisioning to be successful. You can use the command aws ec2 describe-byoip-cidrs --max-results 5 --region <region> to monitor the progress.
For the above example the successful result would look like this:
[cloudshell-user@ip-10-1-2-3 ~]$ aws ec2 describe-byoip-cidrs --max-results 5 --region eu-central-1
{
    "ByoipCidrs": [
        {
            "Cidr": "2a06:e881:73ff::/48",
            "StatusMessage": "Cidr successfully provisioned into Ipv6Pool: ipv6pool-ec2-0123456789abcdefgh",
            "State": "provisioned"
        }
    ]
}
[cloudshell-user@ip-10-1-2-3 ~]$
Notice: At this point the public certificate no longer needs to be placed within the inet6num object of the RIR DB - in this case for RIPE within the “descr:” field. You can therefore remove it. On the other hand if you created the public certificate for a parent IP block and plan to provision additional child blocks later on, you can keep the public certificate in place. In this case make sure you don loose the corresponding private key within your AWS CloudShell and keep an eye on the expiration date of the certificate. The ROA on the other hand has to remain in place!
Advertise the address space
We are almost done and as a last step need to instruct AWS to advertise the BYOIP CIDR from the AWS region into which the address space was provisioned. This is done via the AWS CLI command aws ec2 advertise-byoip-cidr --cidr <cidr> --region <region>.
The result would look like this:
[cloudshell-user@ip-10-1-2-3 ~]$ aws ec2 advertise-byoip-cidr --cidr 2a06:e881:73ff::/48 --region eu-central-1
{
    "ByoipCidr": {
        "Cidr": "2a06:e881:73ff::/48",
        "State": "advertised"
    }
}
[cloudshell-user@ip-10-1-2-3 ~]$
At this point we are done with bringing over the desired IPv6 address space to AWS via BYOIP. But is that address space actually working as expected and how do we use it? Read on in the next paragraph for answers to these questions.
Validation
This section will walk you through the validation of your BYOIP setup. As I’m using real IPv6 address space and not documentation ranges, you will be able to follow along with the below steps on your own.
ROA object for RPKI
You can validate the successful creation of the ROA objects using the RIPEstat Data API, irrespective if the address space in question is administered by RIPE or not. If you are using one of the AWS commercial regions, be sure to test your address range against the Amazon ASNs 16509 and 14618, plus the ASNs that are currently authorized to advertise the address range. If you are using BYOIP with GovCloud (US) check your ROA against the ASN 8987.
You can inspect the ROA objects from different Amazon ASNs with your address range by using the following command: curl --location --request GET "https://stat.ripe.net/data/rpki-validation/data.json?resource=<ASN>&prefix=<CIDR>"
The successful output for the /48 block of 2a06:e881:73ff::/48 that is being used in this example looks like this:
[cloudshell-user@ip-10-1-2-3 ~]$ curl --location --request GET "https://stat.ripe.net/data/rpki-validation/data.json?resource=16509&prefix=2a06:e881:73ff::/48"
{
    "messages": [],
    "see_also": [],
    "version": "0.3",
    "data_call_name": "rpki-validation",
    "data_call_status": "supported",
    "cached": false,
    "data": {
        "validating_roas": [
            {
                "origin": "16509",
                "prefix": "2a06:e881:73ff::/48",
                "max_length": 48,
                "validity": "valid"
            },
            {
                "origin": "14618",
                "prefix": "2a06:e881:73ff::/48",
                "max_length": 48,
                "validity": "invalid_asn"
            },
            {
                "origin": "213151",
                "prefix": "2a06:e881:7300::/40",
                "max_length": 48,
                "validity": "invalid_asn"
            }
        ],
        "status": "valid",
        "validator": "routinator",
        "resource": "16509",
        "prefix": "2a06:e881:73ff::/48"
    },
    "query_id": "20220711193722-64c20e2b-55af-499e-9975-e6e60b24cf6a",
    "process_time": 37,
    "server_id": "app112",
    "build_version": "live.2022.7.11.99",
    "status": "ok",
    "status_code": 200,
    "time": "2022-07-11T19:37:22.292101"
}
[cloudshell-user@ip-10-1-2-3 ~]$
In this example output, the response has a result of “status”: “valid” for the Amazon ASN 16509. This indicates the ROA object for the address range was created successfully.
If on the other side the response includes a response of “status”: “unknown”, it indicates the ROA object for the address range has not been created. And a response of “status”: “invalid_asn” shows that the ROA object for the address range was not created successfully.
With that the following example would indicate that the required ROA for the address space 2a06:e881:73fe::/48 and the ASN 16509 was not created:
[cloudshell-user@ip-10-1-2-3 ~]$ curl --location --request GET "https://stat.ripe.net/data/rpki-validation/data.json?resource=16509&prefix=2a06:e881:73fe::/48"
{
    "messages": [],
    "see_also": [],
    "version": "0.3",
    "data_call_name": "rpki-validation",
    "data_call_status": "supported",
    "cached": false,
    "data": {
        "validating_roas": [
            {
                "origin": "213151",
                "prefix": "2a06:e881:7300::/40",
                "max_length": 48,
                "validity": "invalid_asn"
            }
        ],
        "status": "invalid_asn",
        "validator": "routinator",
        "resource": "16509",
        "prefix": "2a06:e881:73fe::/48"
    },
    "query_id": "20220711194025-926889c0-973e-4f0a-bfb6-ba38551f467c",
    "process_time": 3045,
    "server_id": "app142",
    "build_version": "live.2022.7.11.99",
    "status": "ok",
    "status_code": 200,
    "time": "2022-07-11T19:40:28.961834"
}
[cloudshell-user@ip-10-1-2-3 ~]$
That makes sense as it doesn’t match the IP range from this example.
Public certificate in RIR resource database
Next, let’s validate whether the public certificate has been correctly placed into the RIR’s resource database. This certificate is used by AWS in the provisioning step to validate which AWS account a certain CIDR should be allocated to.
As we are using the RIR RIPE for this example, the command to lookup the public certificate is whois -r -h whois.ripe.net <CIDR> | grep descr | grep BEGIN. Before we can do so, we have to install the command whois within our AWS CloudShell environment via sudo yum -y install whois
With this we should expect the following output for this example:
[cloudshell-user@ip-10-1-2-3 ~]$ sudo yum -y install whois
Loaded plugins: ovl, priorities
amzn2-core                                                                                                                                                                                                                 | 3.7 kB  00:00:00
Resolving Dependencies
--> Running transaction check
---> Package whois.x86_64 0:5.1.1-2.amzn2.0.1 will be installed
--> Finished Dependency Resolution

Dependencies Resolved

==================================================================================================================================================================================================================================================
 Package                                               Arch                                                   Version                                                            Repository                                                  Size
==================================================================================================================================================================================================================================================
Installing:
 whois                                                 x86_64                                                 5.1.1-2.amzn2.0.1                                                  amzn2-core                                                  72 k

Transaction Summary
==================================================================================================================================================================================================================================================
Install  1 Package

Total download size: 72 k
Installed size: 218 k
Downloading packages:
whois-5.1.1-2.amzn2.0.1.x86_64.rpm                                                                                                                                                                                         |  72 kB  00:00:00
Running transaction check
Running transaction test
Transaction test succeeded
Running transaction
  Installing : whois-5.1.1-2.amzn2.0.1.x86_64                                                                                                                                                                                                 1/1
  Verifying  : whois-5.1.1-2.amzn2.0.1.x86_64                                                                                                                                                                                                 1/1

Installed:
  whois.x86_64 0:5.1.1-2.amzn2.0.1

Complete!
[cloudshell-user@ip-10-1-2-3 ~]$ whois -r -h whois.ripe.net 2a06:e881:73ff::/48 | grep descr | grep BEGIN
descr:          -----BEGIN CERTIFICATE-----MIIDyTCCArGgAwIBAgIUR2P0aLZtfm2L9QZI5muMqtCQcM0wDQYJKoZIhvcNAQELBQAwdDELMAkGA1UEBhMCREUxCzAJBgNVBAgMAkhFMRIwEAYDVQQHDAlGcmFua2Z1cnQxFTATBgNVBAoMDEFTMjEzMTUxIExMQzEMMAoGA1UECwwDTk9DMR8wHQYJKoZIhvcNAQkBFhBub2NAYXMyMTMxNTEubmV0MB4XDTIxMDgzMTIxNTg1MFoXDTIyMDgzMTIxNTg1MFowdDELMAkGA1UEBhMCREUxCzAJBgNVBAgMAkhFMRIwEAYDVQQHDAlGcmFua2Z1cnQxFTATBgNVBAoMDEFTMjEzMTUxIExMQzEMMAoGA1UECwwDTk9DMR8wHQYJKoZIhvcNAQkBFhBub2NAYXMyMTMxNTEubmV0MIIBIjANBgkqhkiG9w0BAQEFAAOCAQ8AMIIBCgKCAQEAuVeZfmkEPM2Oh5K9vISgoBFJP/lxuCrZE81VTErGjrPAeXfQaKXJzTf4xL4QZPBJmAbtSD91d4ubGEwVv8FIH8vg712opgLefMDYwv1SoAV0YUG0C23Zadm31MHOWtYX/KgEXOtUkAUuL8QEUH2fgU/6F+0PEBWC985zKTCMxEu2GmyEdjPT0dcun2F/eLFaEjtkZ5Il+ruhoN9grhBWWqau4DG0EyBnkARSmB8zpqSFte6IO+XypSpEglc3792xnLQFVUc1N7jynIMXXIf9fnPKP87jTcxmyDszFfguC9nsdmSDB9VMe3rnnJmDN13nkGWWgtve0grM8yULBb93IwIDAQABo1MwUTAdBgNVHQ4EFgQUaLbwp0B6sJR9bhlQOAFE9Ts/BKkwHwYDVR0jBBgwFoAUaLbwp0B6sJR9bhlQOAFE9Ts/BKkwDwYDVR0TAQH/BAUwAwEB/zANBgkqhkiG9w0BAQsFAAOCAQEAIbvgfqQgCDkKi35Gj0St0aOk1+h8iOdqrW3/JXvNUsIRJJcPpwJyA/kBOuy64YWc9kk7lod+TxFXdMZiUKUFKJtC5FDY2RaR5YpstLNG/+T19ydNLjPQ2WBrUqUyCL9T195/TmZ437k/Rg1VMGisHPlLrOON8IPFg/G3Xy/9fTEQIIZczWlWAprtxacgCMHgZvr31vDEgSNbJux6s+P8YZA7j8M2GclAX13gtim9IeTGgQTjRX9YtlGSP8hHj9vVIxktyyJFF9PphMjlEKuNvlj5rG9YWjjqXUUPrhihlC53MmH7p1dtDKL63f3XAqJPTjJYvj7joBXz4evVVohjEg==-----END CERTIFICATE-----
[cloudshell-user@ip-10-1-2-3 ~]$
You should ensure that the result in the line marked with “descr:” includes both the leading -----BEGIN CERTIFICATE----- and the trailing -----END CERTIFICATE----- part of the certificate and that the certificate itself matches the certificate you created.
You can also copy & paste the result into a online Certificate Decoder to validate that the certificate itself is valid and not expired.
In case you are using one of the other supported RIR, the above command will look slightly different. In the case of ARIN it will be whois -h whois.arin.net r + <CIDR> | grep Comment | grep BEGIN, while for APNIC it is whois -h whois.apnic.net <CIDR> | grep remarks | grep BEGIN.
AWS Provisioning outcome
Above we already saw how the successful provisioning of the BYOIP address space via the aws ec2 provision-byoip-cidr looks like. Here let’s have a look at an unsuccessful provisioning example:
[cloudshell-user@ip-10-1-2-3 ~]$ aws ec2 describe-byoip-cidrs --max-results 5 --region eu-central-1
{
    "ByoipCidrs": [
        {
            "Cidr": "2a06:e881:73fe::/48",
            "StatusMessage": "No X509 certificate could be found in the Whois remarks",
            "State": "failed-provision"
        }
    ]
}
[cloudshell-user@ip-10-1-2-3 ~]$
In this case you can see that the provisioning failed, because AWS was unable to find the public certificate for this IP space within the RIR’s database. And if you look closer, that result does make sense, as we (on purpose) attempted to provision an IP space that hasn’t been prepared.
BGP advertisement
After succesfully provisioning the IP space above we asked AWS to advertise the IP space via the aws ec2 advertise-byoip-cidr command. But how can we tell that this advertisement is actually happening? We can use the Looking Glass server of a major Tier 1 transit provider like the Hurricane Electric Looking Glass service.
Selecting any of the Hurricane Electric Router locations along with the command BGP Route and the Argument 2a06:e881:73ff::/48 for the address space in question will show us the following result.
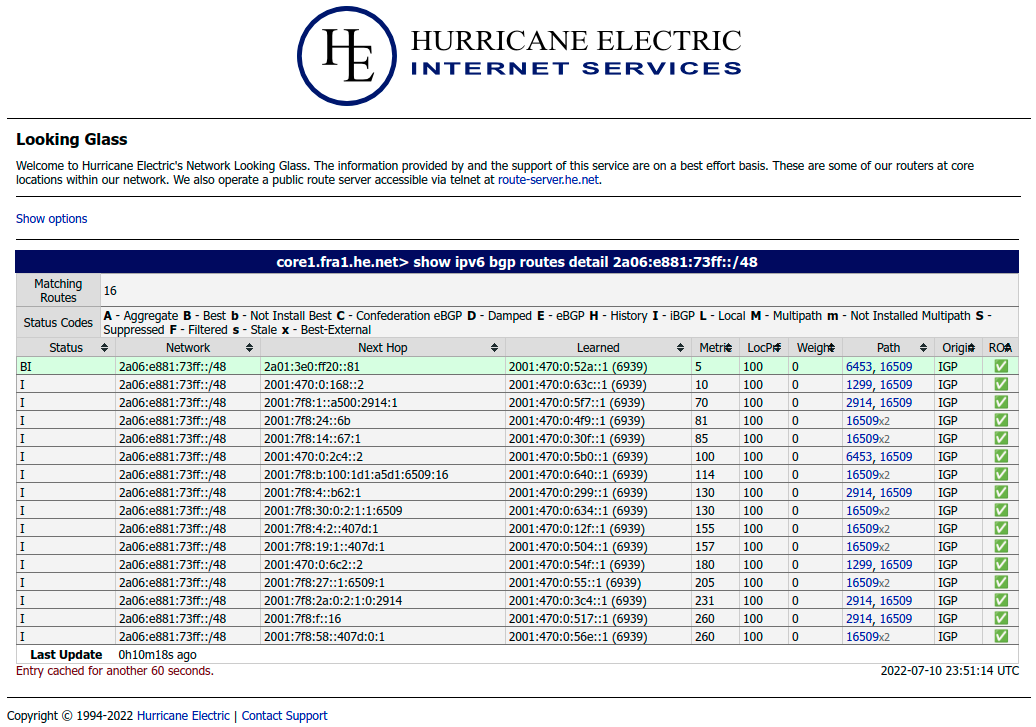
As expected you can see that Hurricane Electric network learns the prefix 2a06:e881:73ff::/48 via multiple different routes. Looking at the path column shows us that some of these routes are directly connected (where path only includes “16509”), while others are via other networks (E.g. the best route via AS6453 - Tata Communications).
Now let’s have a look at a looking glass example for an IP range that was not successfully announced. Let’s use our example from above again for an IP prefix that is not used with AWS BYOIP:
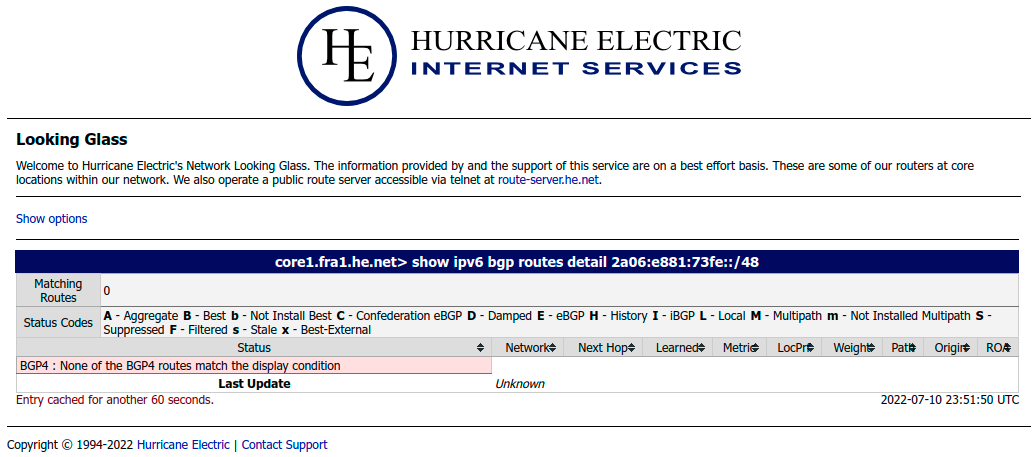
As this particular prefix is not announced on the Internet at all - only its parent block is announced - Hurricane Electric will not have any routes for this particular prefix.
Using BYOIP address space
We have not only provisioned the IP address space, but also validate that everything is correctly working. What remains is the question about how to use this IP prefix in AWS.
AWS Console view of BYOIP CIDR
AWS BYOIP prefixes become regular CIDR pools within the AWS VPC (See Figure 8).
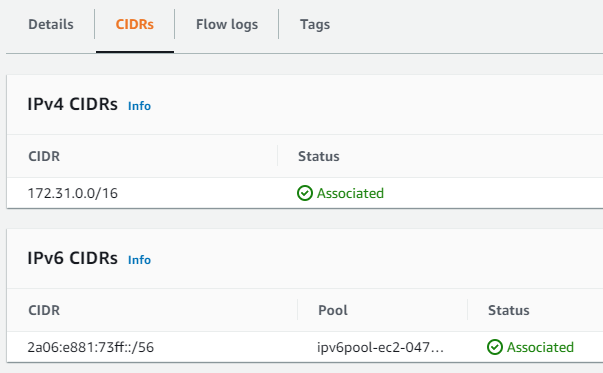
IPv4 prefixes can be used the same way as Elastic IP addresses (EIP) and IPv6 prefixes can be associated with VPCs the same way as AWS provided IPv6 addresses.
Summary
This article provide you a walk-through example of bringing IPv6 address space to AWS via the Bring your own IP addresses (BYOIP) for Amazon EC2 feature. It used a real address space example, so that you can follow along the onboarding and validation of the IP space.
Leave a comment