
How to move your DNS to Amazon Route 53
This blog post will walk through the migration steps of the DNS setup for a public zone to Amazon Route 53. It will include steps for both making Route 53 the DNS service for an existing domain, but also transferring the DNS registration for this domain to Route 53. While it will use Google Domains as the DNS service initially providing the zone and registration service, the steps should be easily transferable to any other DNS provider (e.g. GoDaddy) that you would want to migrate away from.
YouTube Video: The content presented here is also available as a series of YouTube videos.
Note: While you can accomplish most of the steps in this guide within about 1 hour, waiting for DNSSEC to be fully disabled will take 2 days. Therefore if you are planning to follow this guide you might want to skip ahead to the “Disable DNSSEC” step now and come back for the rest in a few days.
Motivation
Recently Google announced the shutdown of the Google Domains service. While by now Google is certainly known for killing off their services with often very little warning, this move came quite unexpected. Google Domains was certainly not perfect, but it offered technical capabilities - like DNSSEC - often well before other DNS provider, the user interface was simple and functional, and at least initially there weren’t any attempts to up-sell you to useless services. Therefore it was a great service which will certainly be missed.
Google’s lackluster attempt to quickly put together a replacement with Google Cloud Domains does not appear very convincing either. With that it is time to move out of Google Domains and find a new home for my domains.
Why Amazon Route 53?
Amazon Route 53 provides a good compromise between cost, resiliency, performance, feature set and ease of use. The cost for a registered domain is well in line with most other providers. With AWS you pay for what you use and as such you will be charged separately for the numbers of zones you use as well as e.g. number of queries your zone receives or whether you use DNSSEC or not. But these cost are very reasonable. Amazon Route 53 is the only AWS service with a 100% uptime SLA on the data plane - meaning responding to DNS queries. And to my knowledge since the service was released in December 2010, this SLA has not been breached. Another huge benefit is the availability of an API, which allows you to programmatically manage almost all components of the domain lifecycle.
Background
First let’s understand what is actually involved when managing a DNS zone. This will help us better understand what steps are necessary to move the management of these components across providers and also what we need to do to move these management components to another provider. For this example I will use the example domain movetor53.com, where we will change both the zone management and also registration services.
Zone Management vs. Registration services
At it’s foundation, DNS allows us to resolve a hostname like www.movetor53.com into an IP address like 198.51.100.123. This is accomplished by a client - e.g. a browser - using a recursive resolver (See Figure 1). An example for such a recursive resolver is Google Public DNS. Simplified speaking the resolver will contact one of the root servers to start the recursion. While the root server doesn’t know the answer for the entire hostname, it does know which top level domain (TLD) servers are responsible for .com and point the resolver to these servers. Similarly for the next request to one of the TLD servers will it point the resolver towards the authoritative server for movetor53.com. Finally after contacting the authoritative server for movetor53.com, will the resolver receive a response for www.movetor53.com.
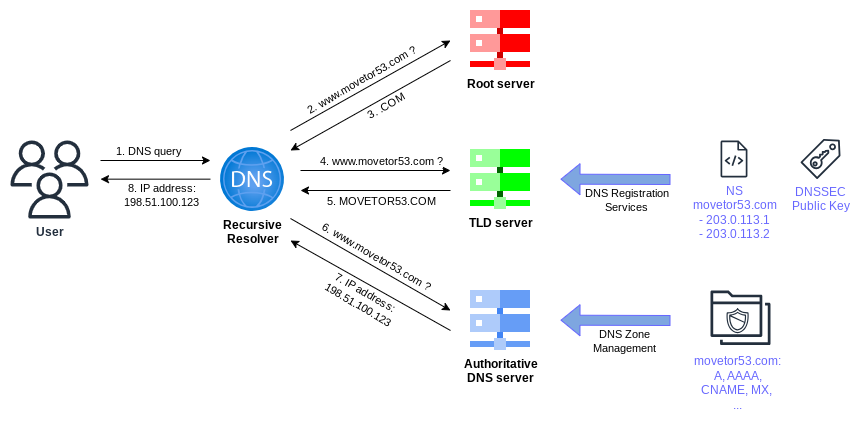
From a DNS management perspective there are two spots that as the owner of movetor53.com we need to change:
-
DNS Zone Management: The DNS zone management controls the actual entries in the zone
movetor53.comitself. It includes creating, changing or deleting records likewwwormail, which can be of different types likeA,AAAA,CNAME,MX, or others. While in the old days you actually had to setup a set of servers running DNS software like BIND, with the availability of DNS services like Route 53, you no longer have to worry about this undifferentiated heavy lifting and can focus on the entries itself. In the case of Route 53 you can thereby make use of DNS server distributed across 400+ Edge Locations. - DNS Registration Services The DNS registration services offer a few main components: 1) Exclusive use of a specific domain name as long as you meet the legal requirements of that particular top level domain, 2) Ability to update the TLD server for that TLD zone with a pointer to the authoritative DNS servers of the domain name, 3) Ability to upload the DNSSEC public key for the specific domain name, to create the chain of trust.
API Usage
While Route 53 offers an API for both the zone management and the registration services, Google Domains does not offer an API. Therefore besides showing the web-console based approach for the migration, I can only show you how to use the API with Route 53. If you are following this walk-through while using another existing DNS provider, you might be able to use this provider’s API to e.g. export the zone file.
Initial setup
Let’s have a look at our initial DNS setup in Google Domains before we start making changes (See Figure 2). As mentioned above we will be using the domain movetor53.com for this guide.
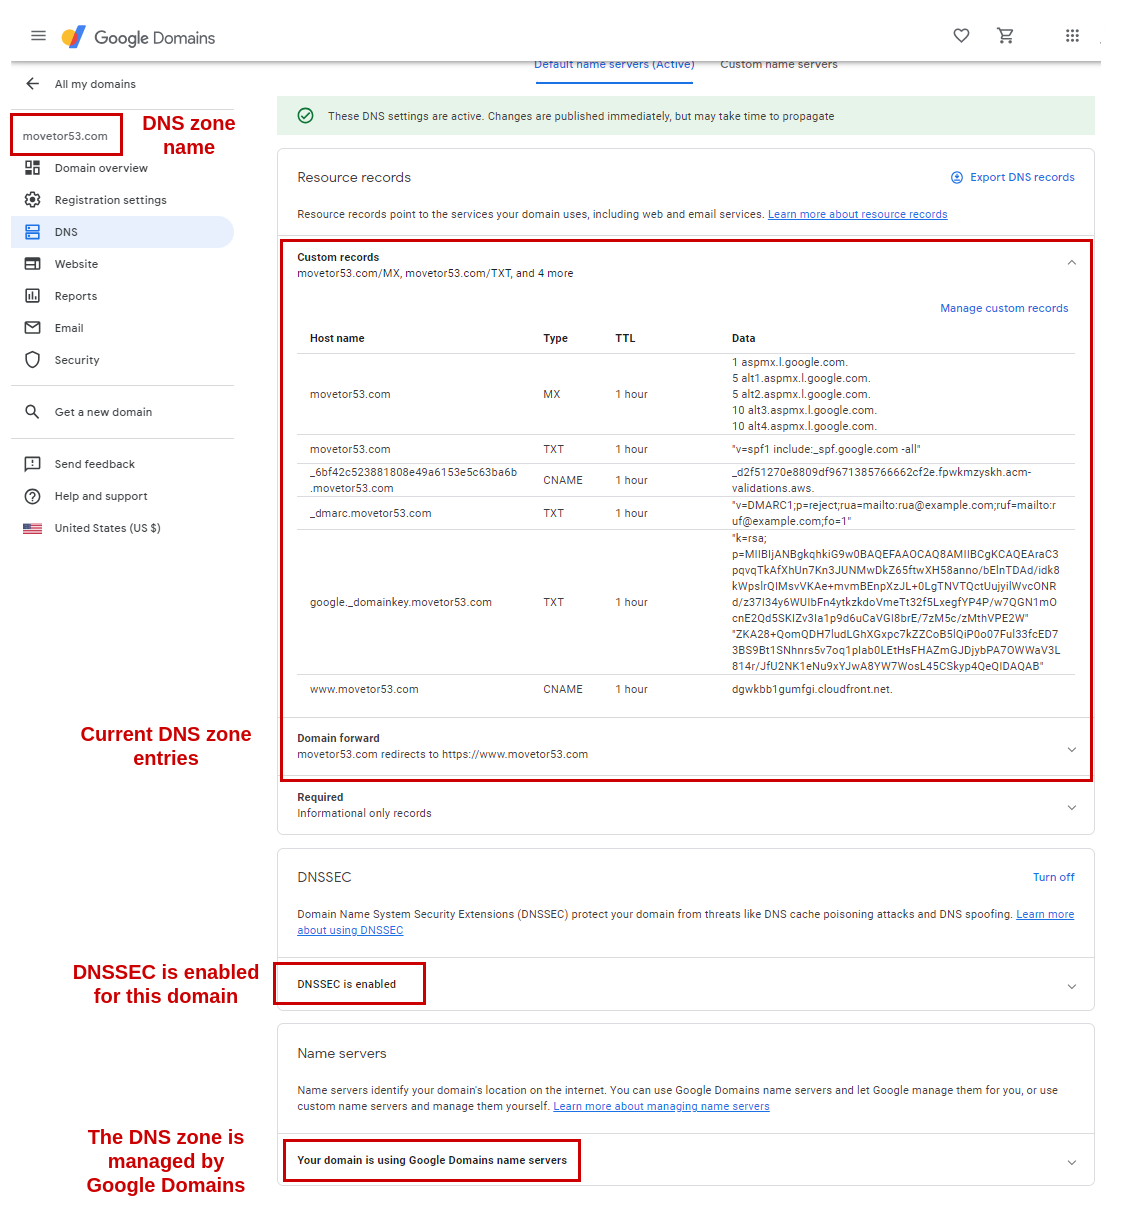
Here we can see a few important facts for the zone movetor53.com:
- Both the zone itself as well as the registration services are with Google Domains.
- DNSSEC is enabled for the zone.
- We can see some typical zone records, including e.g. MX entries for Google Workspaces, also including DKIM public keys. And a CNAME entry for
www.movetor53.compointing towards a CloudFront distribution is also present.
Migration Overview
For the migration we will be looking at three main parts that should be performed in this order:
- Move the DNS zone
- Move the registration services
- Optimize DNS records
Each part has multiple steps.
Note: Many DNS provider - including Google Domains - will remove the DNS zone, when you move the registration services for that domain to another provider. Therefore doing the above parts out of order or even skipping the first part would cause an outage!
Move the DNS zone
In this first part we will move the DNS zone from Google Domains into a Public Hosted Zone on Route 53. Once this part is complete, DNS zone management will be performed in Route 53, while DNS registration services are still with Google Domain.
Disable DNSSEC
Google Domains enabled DNSSEC by default for any supported domains. While there is a technical approach for DNSSEC migrations with the Double-DS KSK rollover method described in RFC 6781 - Appendix D Alternative Rollover Approach for Cooperating Operators, this approach cannot be used here. Therefore first we must disable DNSSEC on our domain by removing any DS or DNSKEY from the TLD zone. Later on, once the zone has been migrated to Route 53, we will enable DNSSEC again.
In Google Domains you disable DNSSEC by selecting Turn off in the DNSSEC section under the DNS tab (See Figure 3).
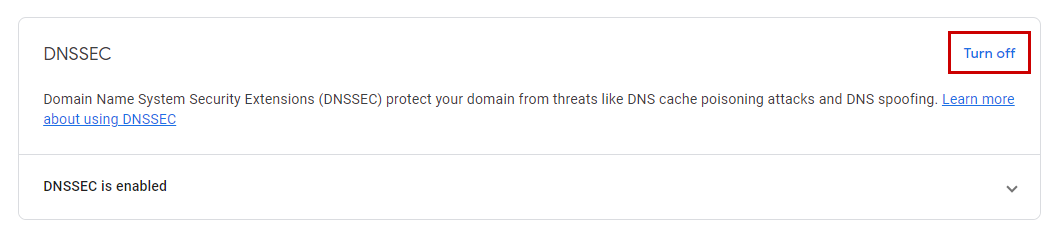
At this point you have to wait 48h for DNS TTLs to expire and thereby for DNSSEC to be fully disabled. Google Domains will show the date and time by when this will be the case (See Figure 4).

While you can continue with the next few steps, we will have to wait for DNSSEC to be fully disable before we can change the nameserver for the zone (final step of this part). There is no way to speed up this wait time and if you choose not to wait you will risk an outage of DNS resolution for your domain.
Export the zone file
Next we want to export the current zone file in a format that we can later import into Route 53. The standard format to exchange such zone files is the BIND format. Therefore most DNS provider offer some kind of capability to export the current zone file within this format. For Google Domains this process is very straight forward: Within the Resource records section on the DNS tab, select Export DNS records and select Export to BIND on the next popup (See Figure 5).
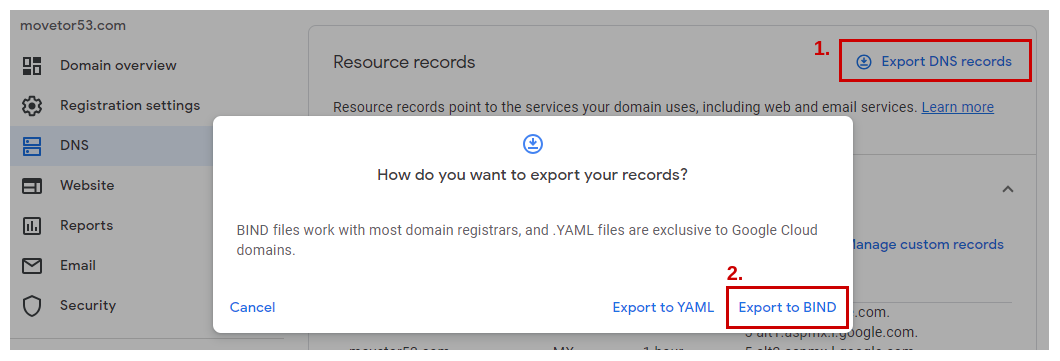
That’s it! The browser will now download the resulting zone file in BIND format. Once you open it with your favorite text editor you’ll see a result similar to the one below for our zone movetor53.com. Each line represents one DNS record and will be imported as such.
; A BIND file is a .TXT file that's used to export
; DNS records from one domain to another. BIND
; files are commonly used by lots of domain
; registrars, so they're a good choice if
; you're exporting resource records to a domain
; that's managed by a different registrar.

movetor53.com. 3600 IN MX 1 aspmx.l.google.com.
movetor53.com. 3600 IN MX 5 alt1.aspmx.l.google.com.
movetor53.com. 3600 IN MX 5 alt2.aspmx.l.google.com.
movetor53.com. 3600 IN MX 10 alt3.aspmx.l.google.com.
movetor53.com. 3600 IN MX 10 alt4.aspmx.l.google.com.
movetor53.com. 3600 IN TXT "v=spf1 include:_spf.google.com -all"
_6bf42c523881808e49a6153e5c63ba6b.movetor53.com. 3600 IN CNAME _d2f51270e8809df9671385766662cf2e.fpwkmzyskh.acm-validations.aws.
_dmarc.movetor53.com. 3600 IN TXT "v=DMARC1;p=reject;rua=mailto:rua@example.com;ruf=mailto:ruf@example.com;fo=1"
google._domainkey.movetor53.com. 3600 IN TXT "k=rsa; p=MIIBIjANBgkqhkiG9w0BAQEFAAOCAQ8AMIIBCgKCAQEAraC3pqvqTkAfXhUn7Kn3JUNMwDkZ65ftwXH58anno/bElnTDAd/idk8kWpslrQIMsvVKAe+mvmBEnpXzJL+0LgTNVTQctUujyilWvcONRd/z37I34y6WUIbFn4ytkzkdoVmeTt32f5LxegfYP4P/w7QGN1mOcnE2Qd5SKIZv3Ia1p9d6uCaVGI8brE/7zM5c/zMthVPE2W" "ZKA28+QomQDH7ludLGhXGxpc7kZZCoB5lQiP0o07Ful33fcED73BS9Bt1SNhnrs5v7oq1pIab0LEtHsFHAZmGJDjybPA7OWWaV3L814r/JfU2NK1eNu9xYJwA8YW7WosL45CSkyp4QeQIDAQAB"
www.movetor53.com. 3600 IN CNAME dgwkbb1gumfgi.cloudfront.net.
movetor53.com. 3600 IN A 216.239.32.21
movetor53.com. 3600 IN A 216.239.34.21
movetor53.com. 3600 IN A 216.239.36.21
movetor53.com. 3600 IN A 216.239.38.21
movetor53.com. 3600 IN AAAA 2001:4860:4802:32::15
movetor53.com. 3600 IN AAAA 2001:4860:4802:34::15
movetor53.com. 3600 IN AAAA 2001:4860:4802:36::15
movetor53.com. 3600 IN AAAA 2001:4860:4802:38::15
Fixing 2048-bit DKIM records
There is one little catch that we need to take care of before we can import this zone file into Route 53 and it’s related to DKIM public key records for Google Workspaces. By default Google Workspaces uses 2048-bit DKIM keys, which you can’t enter as a single text string in a DNS record with a 255-character limit. Although Google provides guidance on how to deal with these keys, that guidance is not very clear and the provided example is actually wrong. In addition the Route 53 Console doesn’t like the way these 2048-bit DKIM records were exported and ignores them. But there is a very quick and easy fix to it.
If you use the Route 53 API to import the zone file in BIND format (See below), this correction is not necessary. Also if you are not using any 2048-bit DKIM keys or other records longer than 255 characters, there is no correction necessary.
You’ll notice a line for the 2048-bit DKIM record in the format of google._domainkey.movetor53.com. 3600 IN TXT "k=rsa; p=<long string>" "<another long string>". The problem here is the whitespace between the two quotation marks (“). Just remove that whitespace to make it look like this: google._domainkey.movetor53.com. 3600 IN TXT "k=rsa; p=<long string>""<another long string>".
The final result should look like this:
...
google._domainkey.movetor53.com. 3600 IN TXT "k=rsa; p=MIIBIjANBgkqhkiG9w0BAQEFAAOCAQ8AMIIBCgKCAQEAraC3pqvqTkAfXhUn7Kn3JUNMwDkZ65ftwXH58anno/bElnTDAd/idk8kWpslrQIMsvVKAe+mvmBEnpXzJL+0LgTNVTQctUujyilWvcONRd/z37I34y6WUIbFn4ytkzkdoVmeTt32f5LxegfYP4P/w7QGN1mOcnE2Qd5SKIZv3Ia1p9d6uCaVGI8brE/7zM5c/zMthVPE2W""ZKA28+QomQDH7ludLGhXGxpc7kZZCoB5lQiP0o07Ful33fcED73BS9Bt1SNhnrs5v7oq1pIab0LEtHsFHAZmGJDjybPA7OWWaV3L814r/JfU2NK1eNu9xYJwA8YW7WosL45CSkyp4QeQIDAQAB"
...
Create a public hosted zone in Route 53
Next we need to create a new public hosted zone in Route 53 for our domain movetor53.com. Head over to the Route 53 console within the AWS Management Console and select Hosted Zones from the navigation pane.
- Choose Create hosted zone. In the Create Hosted Zone pane, enter the name of the domain that you want to route traffic for. In our case it is
movetor53.com. You can also optionally enter a comment. - For Type, accept the default value of Public Hosted Zone and choose Create.
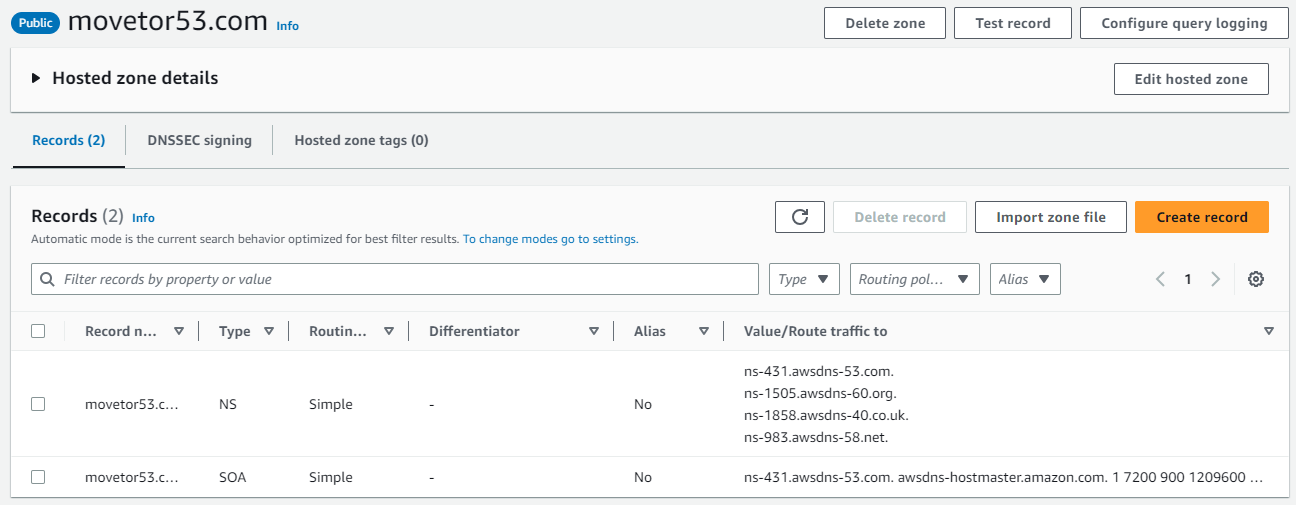
Once the zone has been created you’ll automatically be placed inside this new Public Hosted zone. At this point you will only see the NS record with the four Route 53 nameservers as well as the SOA record (See Figure 6).
Import the zone file into Route 53
You are ready to import the corrected zone file in BIND format into Route 53. For this select Import zone file within the Records pane of the public hosted zone in the Route 53 console. Next copy and paste the entries from the zone file in BIND format into the window that opens (See Figure 7).
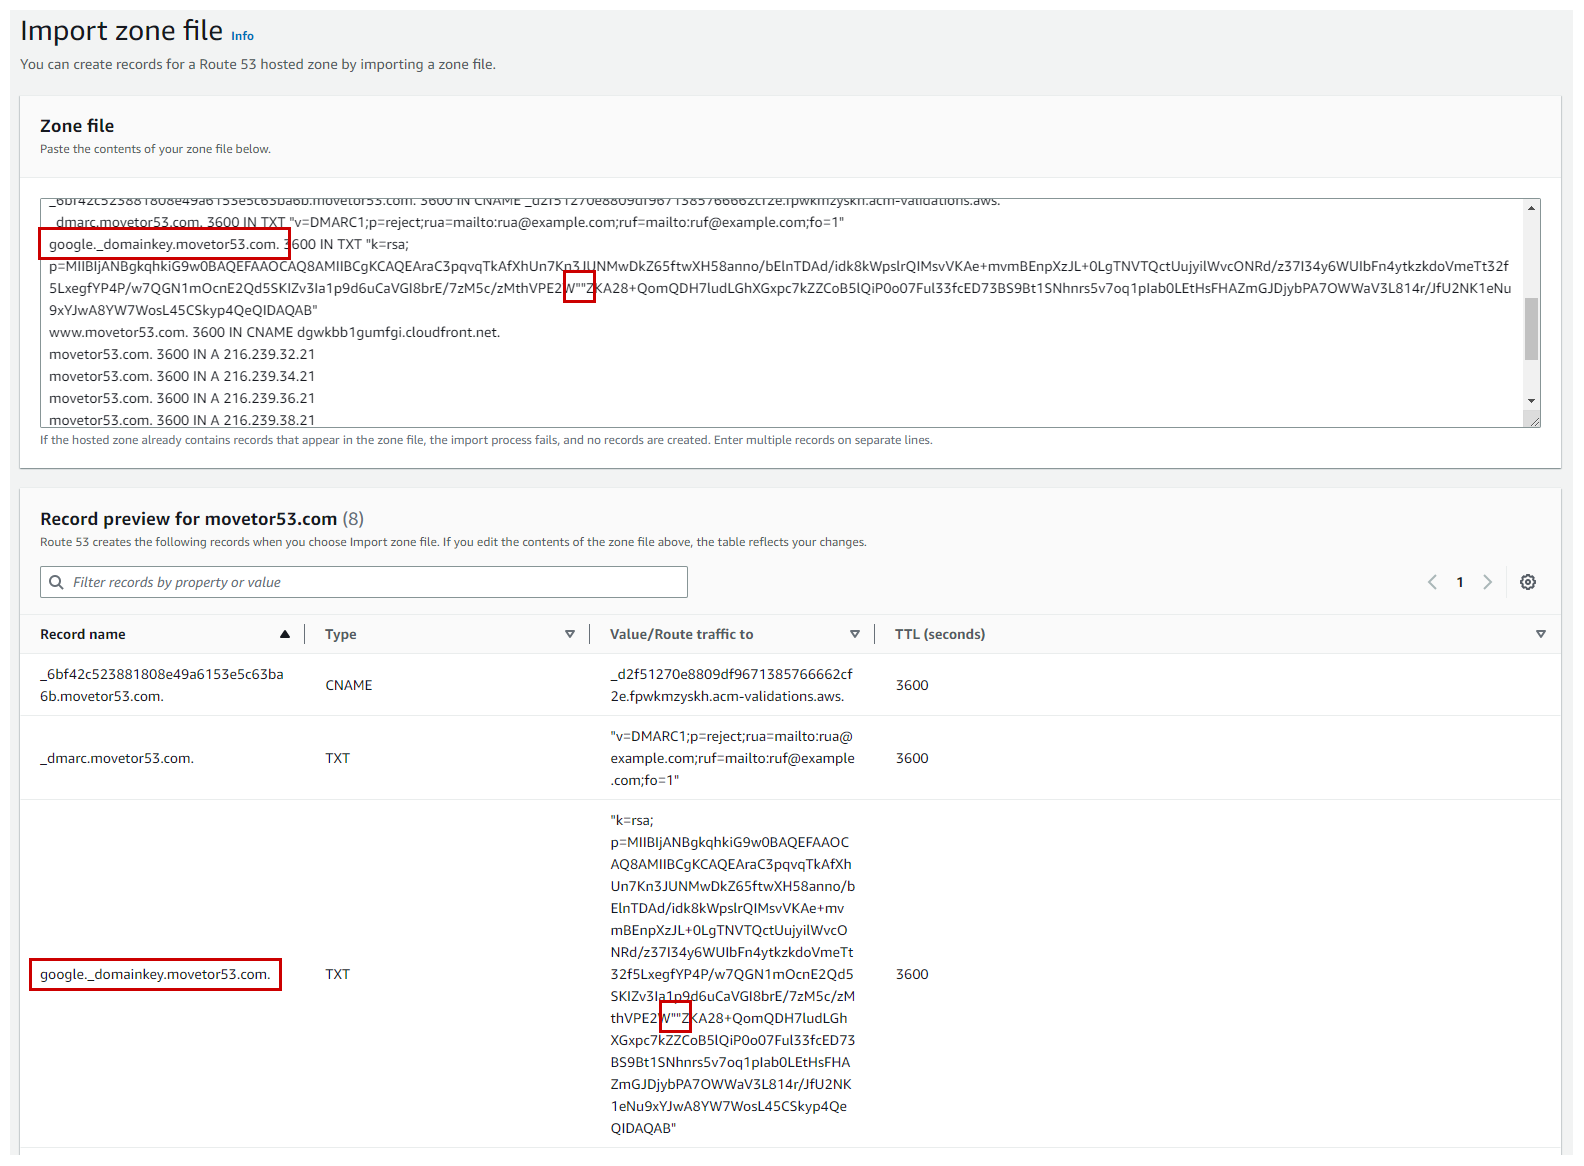
You will see all records that Route 53 was able to identify within the zone file displayed. If you correctly fixed the entry for the 2048-bit DKIM record, by removing the white space, you will also see the corresponding TXT record type entry (See highlighted in red in Figure 7).
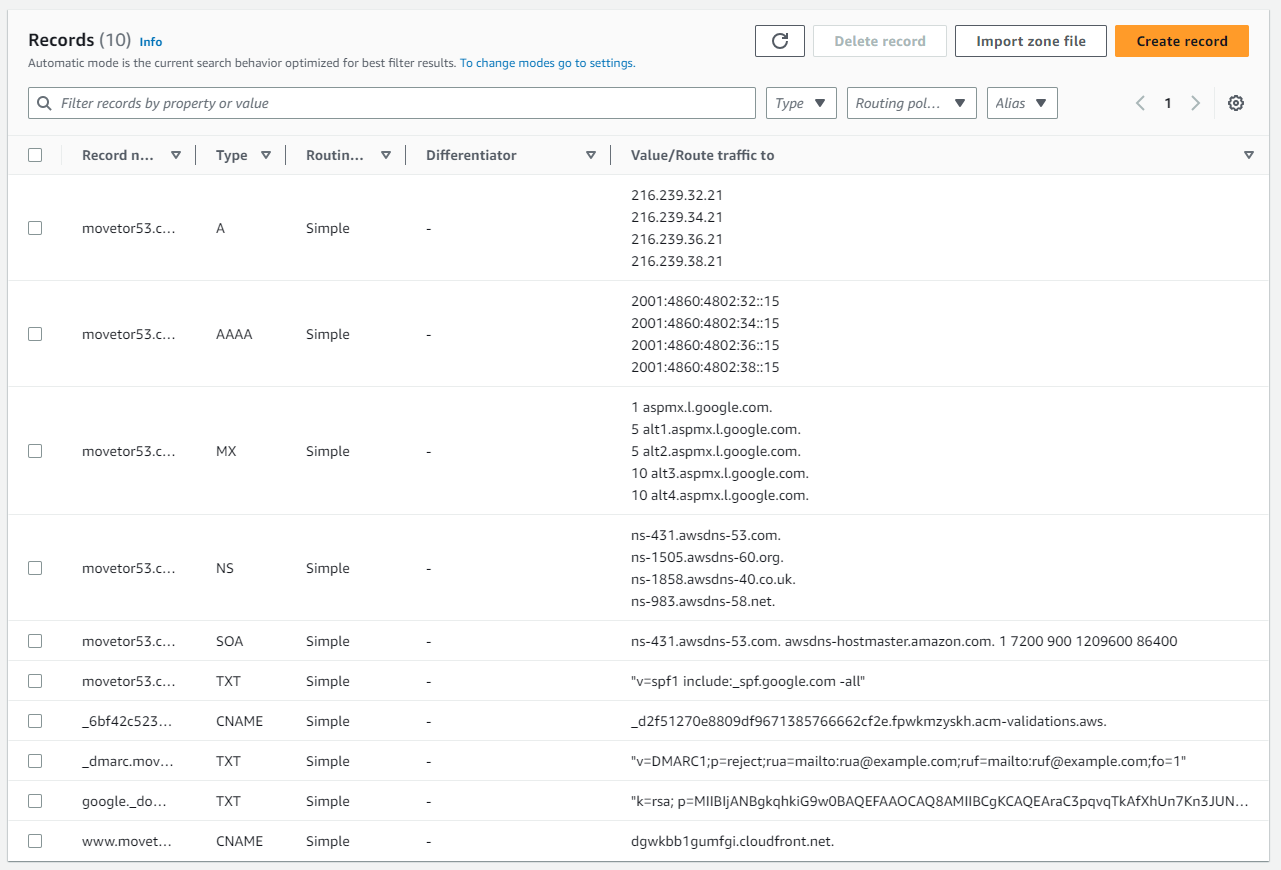
Once everything looks good, click on Import and Route 53 will create all the records into our public hosted zone (See Figure 8).
After a few seconds our zone is ready and can serve traffic via the Route 53 authoritative name servers. But at this point nobody other than us knows yet about this new zone on a different authoritative name server.
Create and import via Route 53 API
If you prefer using the Route 53 API - e.g. because you want to do this process for hundreds of domains - you can look at the very valuable open source command line tool for Amazon Route 53, called “cli53”. You can even run it without any issues within AWS CloudShell. Just download the latest release for amd64, make it executable and you’re ready to run it. If you are using AWS CloudShell you can quickly and easily upload the zone file in BIND format via Action -> Upload file. Also, when running cli53 in AWS CloudShell, AWS credentials don’t need to be configured.
[cloudshell-user@ip-10-1-23-45 ~]$ wget -q https://github.com/barnybug/cli53/releases/download/0.8.22/cli53-linux-amd64
[cloudshell-user@ip-10-1-23-45 ~]$ chmod +x cli53-linux-amd64
[cloudshell-user@ip-10-1-23-45 ~]$ ./cli53-linux-amd64 -v
cli53 version 0.8.22
If you are moving multiple zones, you want to make use of a reusable delegation set within Route 53. By default, Route 53 assigns a random selection of name servers to each new hosted zone. To make it easier to migrate DNS service to Route 53 for a large number of domains, you can create a reusable delegation set and then associate the reusable delegation set with new hosted zones. Therefore all migrated zones will have the same set of four Route 53 authoritative name servers.
To create a new reusable delegation set with cli53, use the command cli53 dscreate. Afterwards you can specify the delegation set ID when creating a new public hosted zone with cli53 create --delegation-set-id <delegation set id> movetor52.com.
Here is how this will look like:
[cloudshell-user@ip-10-2-169-87 ~]$ ./cli53-linux-amd64 dscreate
Created reusable delegation set ID: '/delegationset/N12345678ABCDEFGH1IJK'
Nameserver: ns-1990.awsdns-56.co.uk
Nameserver: ns-118.awsdns-14.com
Nameserver: ns-551.awsdns-04.net
Nameserver: ns-1366.awsdns-42.org
[cloudshell-user@ip-10-2-169-87 ~]$ ./cli53-linux-amd64 create --delegation-set-id N12345678ABCDEFGH1IJK movetor52.com
Created zone: 'movetor52.com.' ID: '/hostedzone/Z12345678ABC9DEF0GH12'
For subsequent domains you would then re-use the same delegation set via --delegation-set-id N12345678ABCDEFGH1IJK and receive the same set of Route 53 authoritative name servers for the zones.
To import the zone file in BIND format with cli53, use the parameter cli53 import --file movetor53.com.zone movetor53.com.
The final result will look like this:
[cloudshell-user@ip-10-1-23-45 ~]$ ./cli53-linux-amd64 import --file movetor53.com.zone movetor53.com
18 records imported (8 changes / 8 additions / 0 deletions)
[cloudshell-user@ip-10-1-23-45 ~]$
Test the new zone
This is the perfect moment to test whether the Route 53 authoritative name servers will respond to DNS queries for the zone movetor53.com in the way that we expect it. A very quick and easy approach to do so is to use the tool dig or a corresponding online service.
If we e.g. want to check whether the above mentioned DKIM record is available in our Route 53 Public hosted zone, we can query one of the Route 53 authoritative name servers for our zone directly:
ubuntu@ubuntu:~$ dig +short TXT google._domainkey.movetor53.com @ns-431.awsdns-53.com
"k=rsa; p=MIIBIjANBgkqhkiG9w0BAQEFAAOCAQ8AMIIBCgKCAQEAraC3pqvqTkAfXhUn7Kn3JUNMwDkZ65ftwXH58anno/bElnTDAd/idk8kWpslrQIMsvVKAe+mvmBEnpXzJL+0LgTNVTQctUujyilWvcONRd/z37I34y6WUIbFn4ytkzkdoVmeTt32f5LxegfYP4P/w7QGN1mOcnE2Qd5SKIZv3Ia1p9d6uCaVGI8brE/7zM5c/zMthVPE2W" "ZKA28+QomQDH7ludLGhXGxpc7kZZCoB5lQiP0o07Ful33fcED73BS9Bt1SNhnrs5v7oq1pIab0LEtHsFHAZmGJDjybPA7OWWaV3L814r/JfU2NK1eNu9xYJwA8YW7WosL45CSkyp4QeQIDAQAB"
The nameserver specified via @ is one of the four authoritative Route 53 name servers for our zone that is listed in the NS record. We can see that Route 53 does deliver a response and that it matches the value from our BIND file.
But this approach is very cumbersome, especially if you want to do this for all records in a large BIND zone file. And also comparing the responses - e.g. a long DKIM key - is not very convenient.
Instead have a look at the tool dns_compare, which automates this task for you. You can either run it locally under Linux or use AWS CloudShell instead. If you are using AWS CloudShell you can quickly and easily upload our zone file in BIND format via Action -> Upload file.
Once you have dns_compare installed, run it while pointing to the local zone file in BIND format and one of the four authoritative Route 53 name servers for the zone.
If everything was imported correctly, dns_compare will report zero mis-matches:
ubuntu@ubuntu:~$ dns_compare --zone movetor53.com --file movetor53.com.zone --server ns-431.awsdns-53.com
........done

Results:
Matches:        8
Mis-matches:    0
In case you e.g. forgot to fix the entry for the 2048-bit DKIM record and it wasn’t imported, the tool will inform you about this mismatch.
ubuntu@ubuntu:~$ dns_compare --zone movetor53.com --file movetor53.com.zone --server ns-431.awsdns-53.com
......X
(MIS-MATCH) query: google._domainkey.movetor53.com.
Expected:  3600 IN TXT "k=rsa; p=MIIBIjANBgkqhkiG9w0BAQEFAAOCAQ8AMIIBCgKCAQEAraC3pqvqTkAfXhUn7Kn3JUNMwDkZ65ftwXH58anno/bElnTDAd/idk8kWpslrQIMsvVKAe+mvmBEnpXzJL+0LgTNVTQctUujyilWvcONRd/z37I34y6WUIbFn4ytkzkdoVmeTt32f5LxegfYP4P/w7QGN1mOcnE2Qd5SKIZv3Ia1p9d6uCaVGI8brE/7zM5c/zMthVPE2W" "ZKA28+QomQDH7ludLGhXGxpc7kZZCoB5lQiP0o07Ful33fcED73BS9Bt1SNhnrs5v7oq1pIab0LEtHsFHAZmGJDjybPA7OWWaV3L814r/JfU2NK1eNu9xYJwA8YW7WosL45CSkyp4QeQIDAQAB"
Received:  None
.done

Results:
Matches:        7
Mis-matches:    1
While Route 53 supports a lot of DNS record types, some newer and not frequently used types are not supported yet. Google Domains does already support some of these record types, which are namely: HTTPS, SVCB, SSHFP, and TLSA. If you see mis-matches involving these record types, you’ll have to forgo using these entries.
Once you have confirmed no other mis-matches exist between the exported zone file and the new Route 53 Public Hosted Zone, we are ready to let the world know about these new Route 53 authoritative name servers.
Enable DNSSEC (Optional)
While enabling DNSSEC again is completely optional, it is highly recommended due to the benefits that DNSSEC brings to the table. And while using DNSSEC with Route 53 incurs an extra cost of US$ 1 / month for storing the AWS Key Management Service (AWS KMS) customer managed key (CMK) for the DNSSEC Key-signing key (KSK), that CMK can be shared across multiple zones to reduce cost.
Also you’ll notice that the complexity and overhead for enabling and using DNSSEC is quite low with Route 53, as almost everything is done for you.
To enable DNSSEC on our zone, head over to the DNSSEC signing tab within the Public Hosted Zone and choose Enable DNSSEC signing.
- In the Key-signing key (KSK) creation section, enter a name for the KSK that Route 53 will create into the Provide KSK name field.
- Under Customer managed CMK in AWS KMS, choose the customer managed key for Route 53 to use when it creates the KSK for you. You can use an existing customer managed key that applies to DNSSEC signing, or create a new customer managed key. You can re-use the same customer managed CMK for multiple DNS zones in Route 53. Once complete click on Create KSK and enable signing.
Next we need to lookup the information to establish the chain of trust. Within the DNSSEC signing tab select View information to create DS record and expand the Establish a chain of trust block (See Figure 9).
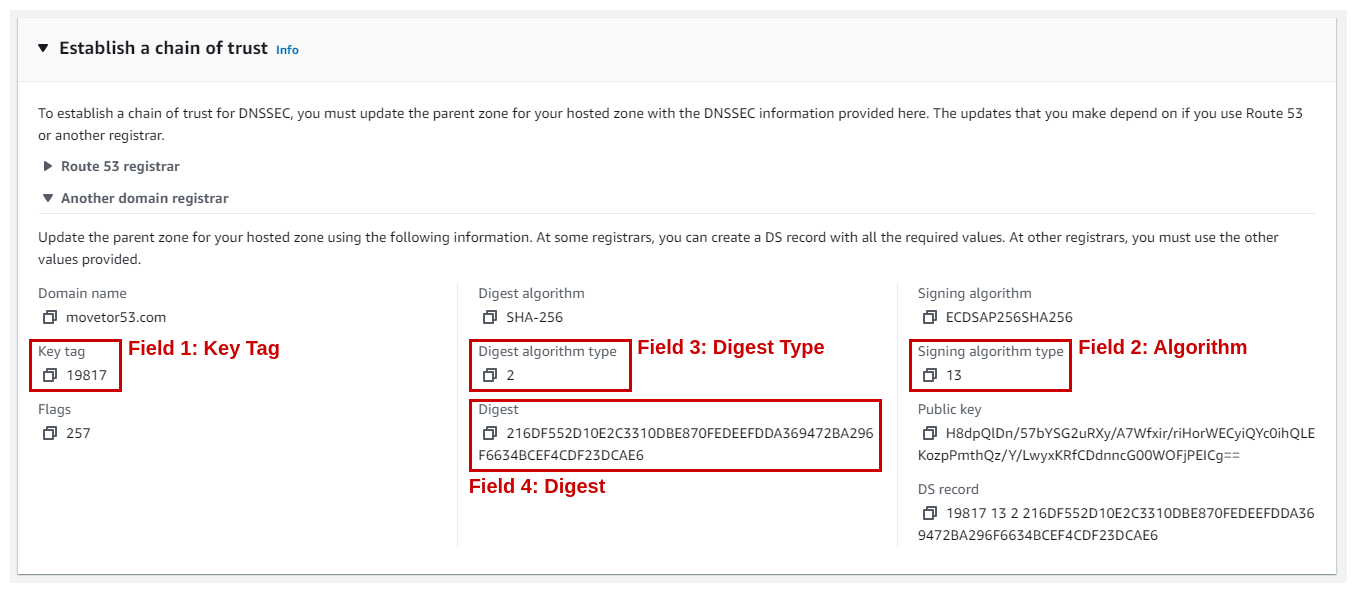
Out of the many displayed values we will only need four of them for the case of Google Domain:
- Field 1: Key Tag
- Field 2: Algorithm (aka “Signing algorithm type”)
- Field 3: Digest Type (aka “Digest algorithm type”)
- Field 4: Digest
Change the nameserver for the zone
We are almost done with moving the DNS zone for movetor53.com. As a last step we need to update the nameserver for that zone within the TLD severs for .COM.
Make sure to only commence with this step after the 48 hours for disabling DNSSEC in Google Domains have completed (See above).
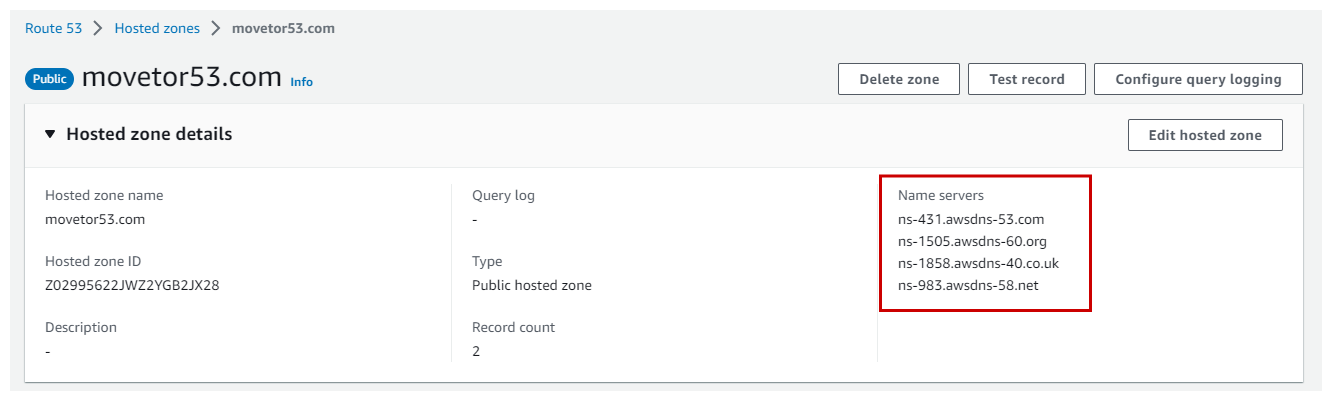
Within the Route 53 Console lookup the nameservers for the newly created Public Hosted Zone. You will find these four nameservers in the Hosted zone details section (See Figure 10).
Next, head back to Google Domains to change the nameservers for the zone.
Under the DNS tab select *Custom name servers to start the setup. Enter the following data (See Figure 11):
- Name servers: Within the Name servers section enter the four nameserver that correspond to the newly created Route 53 Public hosted zone.
- DNSSEC (Optional): If you want to use DNSSEC, enter the DNSSEC details to establish the chain of trust. You have looked up the corresponding data for the fields Key Tag, Algorithm, Digest Type, and Digest in the previous step.
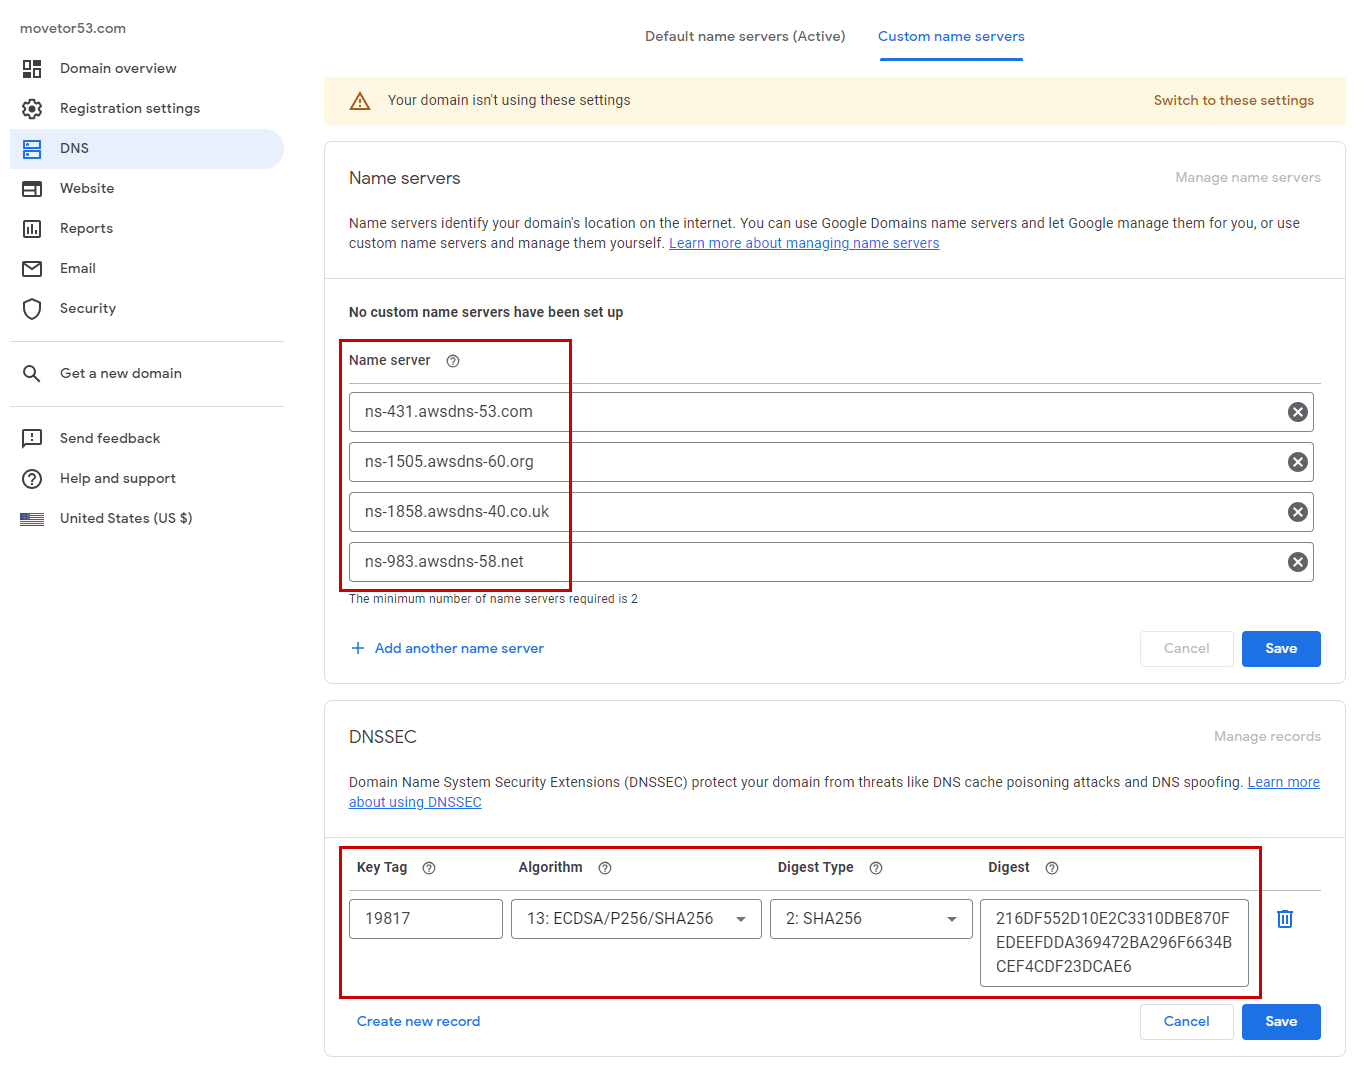
Once complete, select Save for both sections. Afterwards click on Switch to these settings in the yellow box at the top of the screen.
At this point it will take up to 48 hours for the zone of the domain to be fully moved from Google Domains to Route 53. During this time you should not make any changes to the records in the zone. Unfortunately Google Domains does not offer you the capability to reduce the TTL for NS records and thereby speed up this migration window.
Move the registration services
While the zone is being fully moved from Google Domains to Route 53 we can already start moving the registration services from Google Domains to Route 53 as well.
To do so we start in Google Domains on the Registration Settings tab of the domain. In the Domain registration section:
- Under Domain lock make sure your domain is unlocked.
- To the right of Transfer out click Get auth code. Select To a different domain registrar and click Continue. Copy the authorization code. We will use it very shortly.
Head over to the Route 53 Domain Registrar Console within the AWS Console.
- Select Transfer in -> Single domain.
- Enter the domain name to transfer and click on Check.
On the next page you’ll see if the domain can be transferred (See Figure 12).
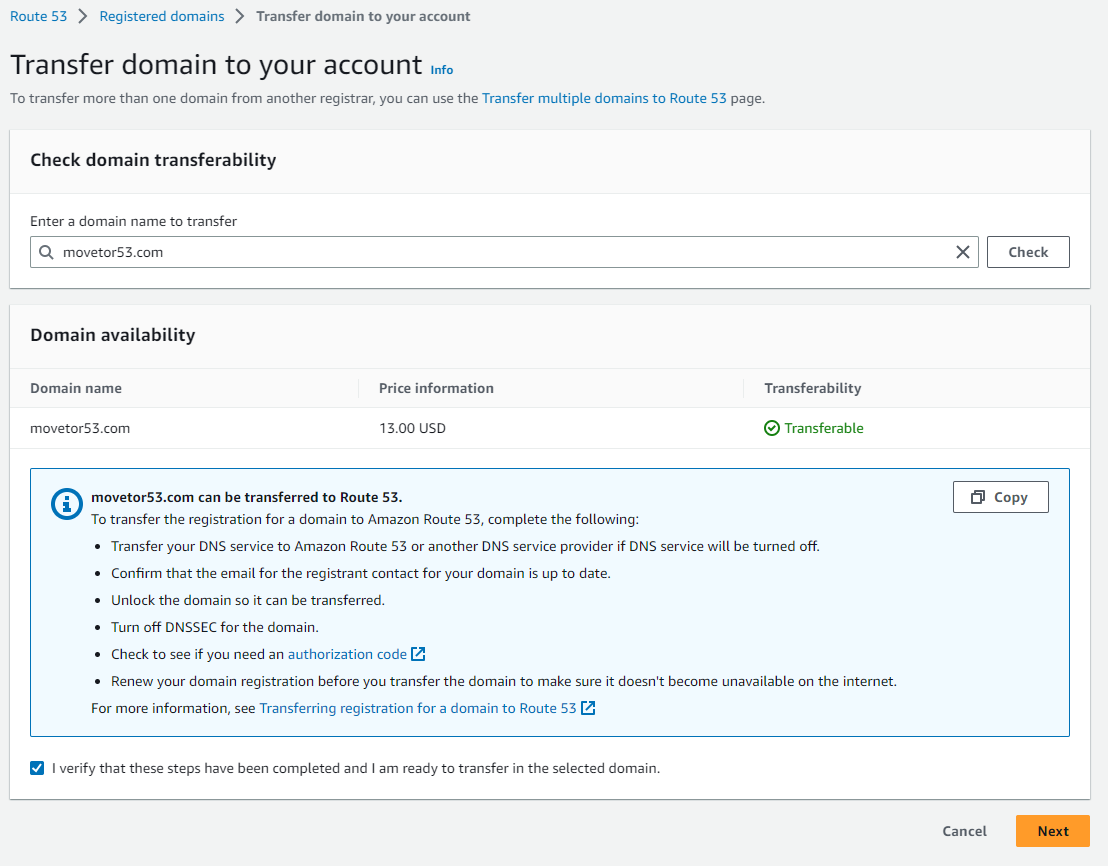
If the domain can be transferred, select I verify that these steps have been completed and I am ready to transfer in the selected domain. to get started with the transfer process.
Note: The Route 53 Domain Transfer process will ask you to turn off DNSSEC for the domain to be transferred. We can safely ignore this in this scenario here as the nameserver and DNSSEC keys have already been updated to the new Route 53 Public Hosted Zone.
Fill out the subsequent fields, which will ask for the authorization code, or Auth Code that you generated in Google Domains, but also your contact details. Furthermore you should notice that you do not need to update the nameservers during this process, as Route 53 nameservers are already being used for this domain.
Once you have completed all forms and reviewed the entered information, you can select Submit request.
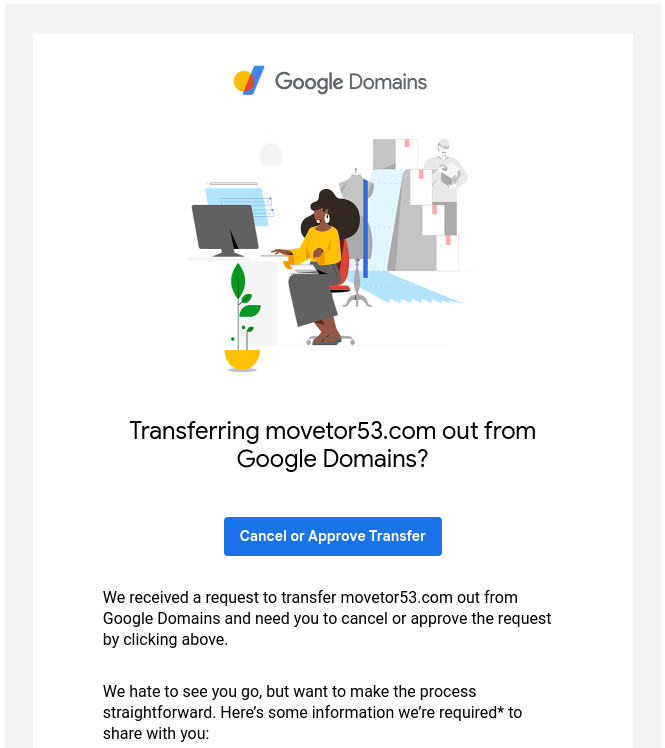
After several minutes you will receive an Email from Google Domains asking to either cancel of approve the Transfer (See Figure 13). Click on the link in the Email and select Approve.
After several minutes the Transfer will complete and you will receive a notification from Route 53 about the completion. After a few hours the migrated domain will disappear in the Google Domains portal. Congratulations! At this point all your DNS management needs are done via Route 53.
Use the Route 53 API
While cli53 does not support Route 53’s registration services, you can use the AWS CLI to move a domain. This is especially useful if you want to move many domains. And as with the previous API examples you can even run it without any issues within AWS CloudShell.
Usually when migrating many domains the contact details for these domains remain the same and only the domain name and authentication code changes. With that in mind we will split the part that remains the same from what changes.
Everything that remains the same will go into a JSON file - let’s call it r53-domain-registrar.json - and looks like this:
{
    "DurationInYears": 1,
    "AutoRenew": true,
    "AdminContact": {
        "FirstName": "Martha",
        "LastName": "Rivera",
        "ContactType": "PERSON",
        "OrganizationName": "Example",
        "AddressLine1": "1 Main Street",
        "City": "Anytown",
        "State": "WA",
        "CountryCode": "US",
        "ZipCode": "98101",
        "PhoneNumber": "+1.8005551212",
        "Email": "mrivera@example.com"
    },
    "RegistrantContact": {
        "FirstName": "Li",
        "LastName": "Juan",
        "ContactType": "PERSON",
        "OrganizationName": "Example",
        "AddressLine1": "1 Main Street",
        "City": "Anytown",
        "State": "WA",
        "CountryCode": "US",
        "ZipCode": "98101",
        "PhoneNumber": "+1.8005551212",
        "Email": "ljuan@example.com"
    },
    "TechContact": {
        "FirstName": "Mateo",
        "LastName": "Jackson",
        "ContactType": "PERSON",
        "OrganizationName": "Example",
        "AddressLine1": "1 Main Street",
        "City": "Anytown",
        "State": "WA",
        "CountryCode": "US",
        "ZipCode": "98101",
        "PhoneNumber": "+1.8005551212",
        "Email": "mjackson@example.com"
    },
    "PrivacyProtectAdminContact": true,
    "PrivacyProtectRegistrantContact": true,
    "PrivacyProtectTechContact": true
}
Afterwards we will use the AWS CLI command aws route53domains transfer-domain to pass this file along with the parameters that need to be adapted for each domain, which is namely the domain name and the “Auth Code”.
Using AWS CloudShell as an example again, result will look like this:
[cloudshell-user@ip-10-1-23-45 ~]$ aws route53domains transfer-domain --region us-east-1 --domain-name movetor53.com --auth-code ")o!v3dJeXampLe" --cli-input-json file://r53-domain-registrar.json
{
    "OperationId": "a012ab3c-d45e-67f9-gh01-i23j4k567lm8"
}
Note that even if you are running this AWS CLI command on a Linux-based machine - like AWS CloudShell - you have to specify the file via the file://filename format.
This way we could write a quick shell script that iterates through a list of domain names and “Auth Codes”, calling the above AWS CLI command for each of them.
Optimize DNS records (Optional)
As a final optional step we should optimize certain records in the Route 53 Public Hosted Zone by making use of alias records.
Route 53 alias records are a Route 53–specific extension to DNS functionality. Alias records let you route traffic to selected AWS resources, such as CloudFront distributions or Amazon S3 buckets. They also let you route traffic from one record in a hosted zone to another record.
Unlike a CNAME record, you can create an alias record at the top node of a DNS namespace, also known as the zone apex. For example, here in our example the zone apex is movetor53.com. While you cannot create a CNAME record for movetor53.com you can create an alias record for movetor53.com that routes traffic to e.g. a CloudFront distribution.
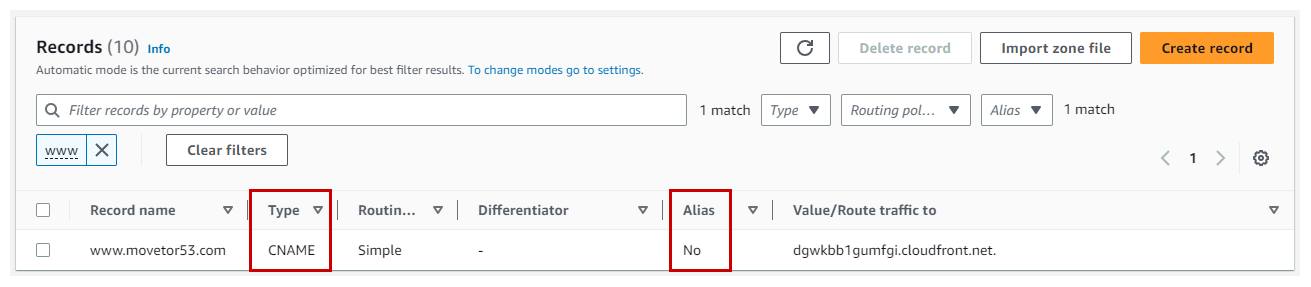
To showcase one example, where we previously had to use a CNAME record with Google Domains, have a look at the record for www.movetor53.com movetor53.com (See Figure 14). The drawback of this CNAME is that clients have to make two DNS requests to resolve www.movetor53.com into an IP address. One for the CNAME and another one for dgwkbb1gumfgi.cloudfront.net that this CNAME points to.
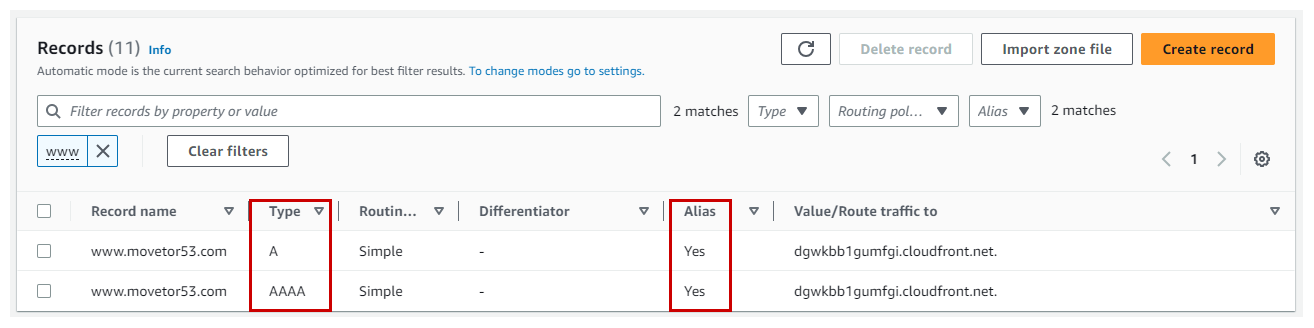
With a DNS record of type Alias, the A record for www.movetor53.com would directly translate into an IPv4 address, while the AAAA record directly translates to an IPv6 address. And now that the domain movetor53.com is on Route 53, we can replace this CNAME record with an A and AAAA record, making use of the Alias type (See Figure 15).
URL Forwarding
While Google Domains supports URL Forwarding natively, Route 53 doesn’t. That’s because Route 53 purely focuses on DNS functionality, while URL Forwarding is a function of HTTP(s) as outline in a previous blog post. In AWS you can use Amazon CloudFront to achieve the same. If you want to learn how to do this, head over to my previous blog post on “URL Redirect with Amazon CloudFront and Amazon Route 53”.
Summary
This blog post walked you through the migration steps of moving a domain from a DNS service provider like Google Domains to Route 53. It included steps for both moving the DNS zone as well as the registration services. At the end of this guide your domain will be fully moved from Google Domains to Route 53. While all shown steps and screenshots are specific to Google Domains, the same concept applies when migrating away from other DNS provider as well.
Leave a comment