
OpenStack with vSphere and NSX - Part 4: Import and configure the VMware vSphere OpenStack Virtual Appliance (VOVA)
Notice: This article is more than 12 years old. It might be outdated.
Welcome to part 4 of the series: “OpenStack with vSphere and NSX” on installing OpenStack with VMware vSphere and VMware NSX. This series shows the deployment of an OpenStack cloud that leverages VMware vSphere – along with it’s well-known enterprise-class benefits such as VMotion – as the underlying Hypervisor. In addition, network virtualization within OpenStack will be provided via NSX as a Neutron plugin. This allows the creation of virtual networks within OpenStack that consist of L2 segments and can be interconnected via L3 to each other or the outside world.
In the previous post we completed the installation of the NSX cluster, including ESXi as Hypervisors. In this article we will see the import and configuration of the VMware vSphere OpenStack Virtual Appliance (VOVA).
VMware vSphere OpenStack Virtual Appliance (VOVA)
VOVA is an appliance that was built to simplify an OpenStack deployment into a VMware vSphere environment for test, proof-of-concept and education purposes. VOVA runs all of the required OpenStack services (Nova, Glance, Cinder, Neutron, Keystone, and Horizon) in a single Ubuntu Linux appliance and can easily be deployed with an existing VMware vSphere cluster. VOVA is a Ubuntu Linux (64-bit) VM with 1 vCPU, 2 GB of RAM and 40 GB of disk space.
It is available for download from the VMware OpenStack community site.
Important Notes:
- The version currently available for download (VOVA 0.2.0) is not what I will be using. I’m using a special version that is not (yet?) publicly available and already includes the OpenStack neutron plugin for VMware NSX.
- The network configuration required for VOVA 0.2.0 differs fundamentally from what you will see here, as it uses OpenStack Flat Networking instead of Neutron.
- In this setup we will use a very simple physical network setup. All components will attach to a common Mgmt / VM Network. This means that VOVA uses a single interface only. Please do not use such a simple network setup, sharing management and tenant traffic on the same network segment, in a production environment!
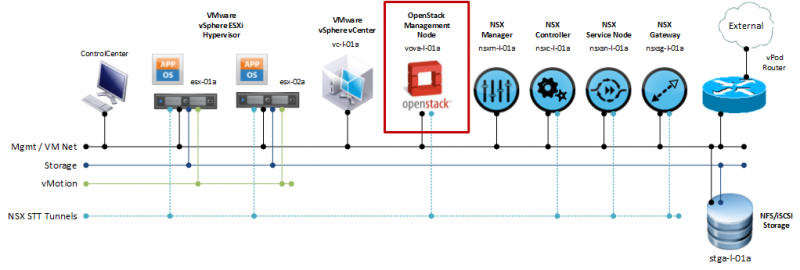
After importing the VOVA appliance it will communicate with the NSX controller cluster and the VMware vSphere vCenter (See Figure 1). But it will also house the OpenStack Neutron plugin and thus provide the DHCP server capability to the OpenStack cloud. This will require VOVA to join the NSX overlay network as a transport node. How this is done will also be shown later on in this article. For now, let’s focus on importing and configuring VOVA.
Gather the pre-requisites
VOVA is provided as an Open Virtualization Format image (OVA). During installation one needs to enter the initial configuration parameters, which consists of IP address information for the appliance itself, but also for the services that it interacts with. Before starting the actual OVA import, let’s make sure we have all the information available that we need.
In particular we need:
- IP addressing information for VOVA, including default gateway and DNS resolver.
- IP address and account credentials of the vSphere vCenter.
- IP address and account credentials of the NSX Controller Cluster.
- Name of the “Datacenter”, “Clusters” and “Datastores” in vCenter for the cluster that VOVA will manage.
- UUID of the NSX Transport Zone and UUID of the Gateway Service.
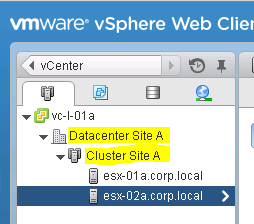
Within the vSphere Web Client look up the Name of the “Datacenter”, “Clusters” and “Datastores” in vCenter (See Figure 2). If you are only using a single datastore that is accessible from all ESXi servers within the cluster, you do not need to look up its name.
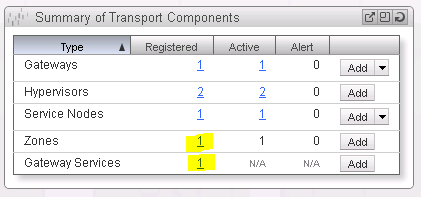
Next we need to return to the NSX Manager in order to look up the UUID of the NSX Transport Zone and Gateway Service. On the Dashboard click on the registered number for the corresponding entry (See Figure 3).
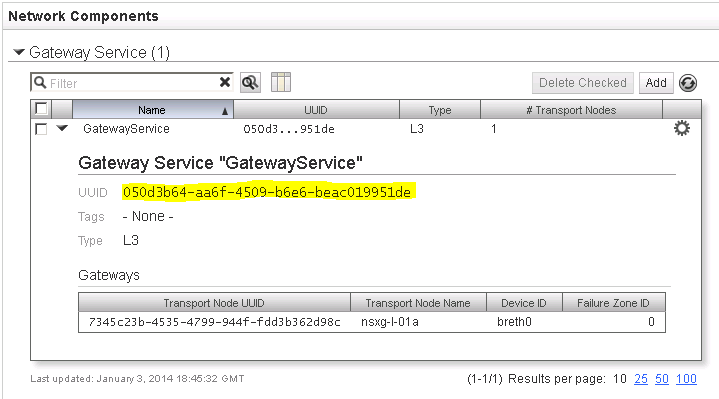
Note down the UUID of the NSX Gateway Service (See Figure 4).
Next, note down the UUID of the NSX Transport Zone (See Figure 5).
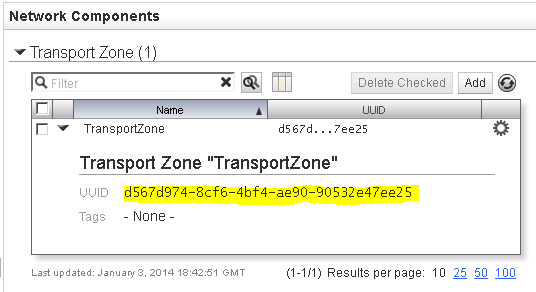
Ensure that you collected the above information without any errors or mistakes. During the VOVA import you will not be able to verify if the information entered are correct. You will only find out after the VOVA import has completed, when things are not working as expected. Therefore please take your time now and ensure that the gathered information are correct.
installation
Import of VOVA OVA
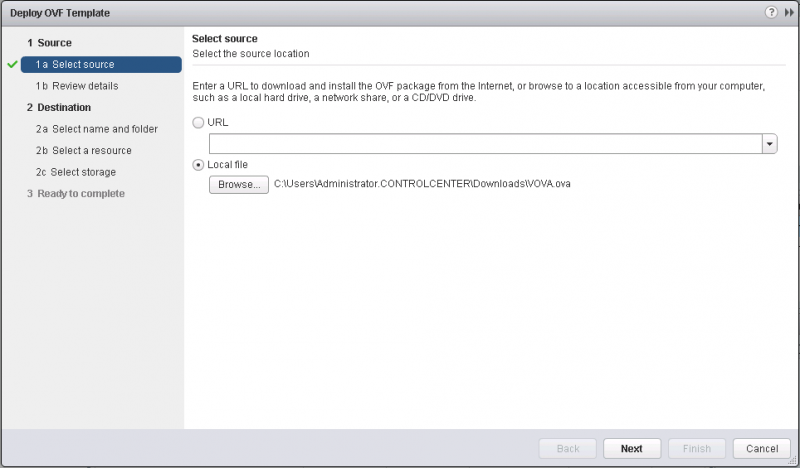
Next comes the import of the OVA image for the VMware vSphere OpenStack Virtual Appliance. This step does not differ dramatically from what we already know about OVA imports.
Let’s get started by picking the correct file for the import (See Figure 6).
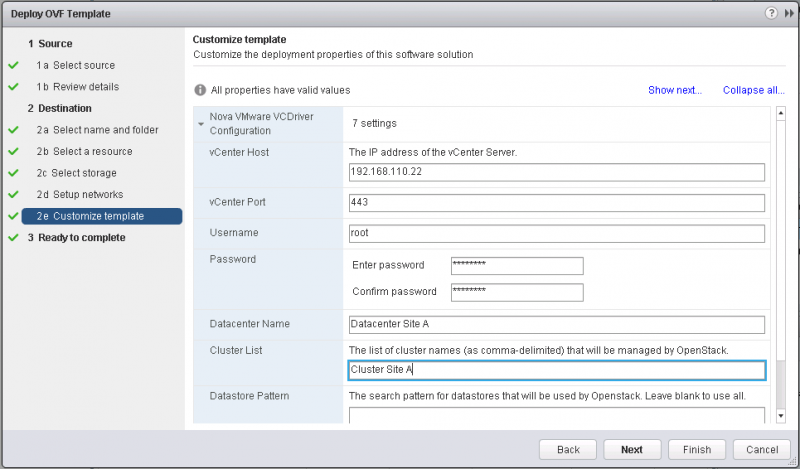
Choose the default settings or your site specific settings for the rest of the import. Once you get to the Customize template tab, specify the VMware vSphere vCenter information (See Figure 7). This includes:
- IP address and port of the vCenter Server.
- Accound credential for the vCenter Server with sufficient privileges.
- Name of the “Datacenter” that contains the clusters and name of the clusters that will be managed by OpenStack.
- Search pattern for datastores that will be used by OpenStack. Leave this field blank to use all datastores or if you only have a single data store.
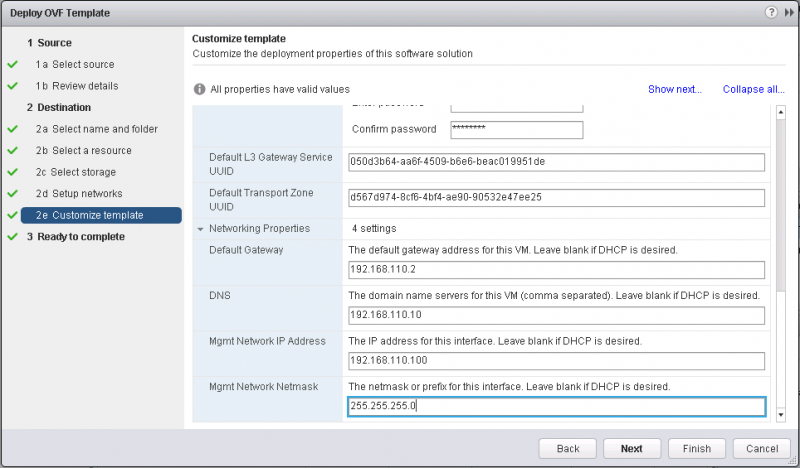
Specify the OpenStack Neutron plugin for VMware NSX information (See Figure 8). This includes:
- One of the IP addresses for the NSX Controller cluster.
- Account credentials for the NSX Controller cluster with sufficient privileges.
- UUID of the L3 Gateway Service.
- UUID of the Transport Zone.

Specify the networking properties for the VOVA appliance itself (See Figure 9).
Complete the OVA import and boot up the VM. The startup procedure can take a few minutes, after which you can connect with a Web Browser to the IP address or hostname of the VOVA appliance (See Figure 10). Don’t login yet as we are not done yet.
Firewall settings to allow VNC access to VM workloads
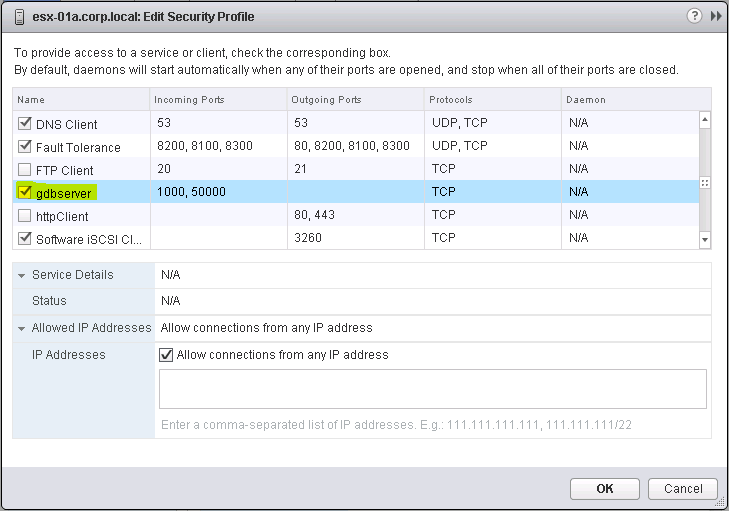
OpenStack uses the Virtual Network Computing (VNC) protocol to access the VM workloads from the web interface Horizon. In a VMware vSphere environment this requires that the port range TCP/5900 through TCP/6000 is available for VNC connections on every ESXi host in all the clusters that will be managed by the appliance. This in return requires that these ports are allowed within the ESXi firewall of all ESXi hosts. The easiest way to do this in a non-production is setting is just to abuse the existing firewall profile for gdbserver, since this opens everything VNC needs and more.
Navigate to the ESXi host and select Manage -> Settings -> System -> Security Profile -> Edit (See Figure 11).
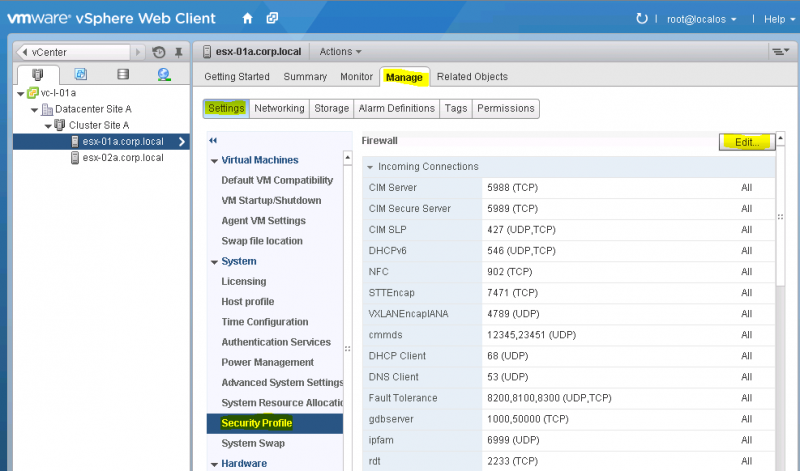
Ensure the checkbox for the security profile gdbserver is ticked and confirm with OK (See Figure 12).
This completes the import and configuration of the VMware vSphere OpenStack Virtual Appliance (VOVA). While we might be tempted login to VOVA and start playing around, we are not quite there yet. The network setup of VOVA in combination with the OpenStack Neutron plugin for VMware NSX is not yet complete.
Install Open vSwitch on VOVA
Next we need to install the Open vSwitch (OVS) on VOVA. This is necessary as the Neutron plugin of OpenStack serves as the DHCP server on the L2 segments that will be created. As the Neutron plugin resides on VOVA, it needs to have connectivity to the NSX overlay network.
The OVS is not yet installed in VOVA out-of-the-box, as it needs to match the NSX version that is being used. In the future it might be possible that the following steps become largely redundant as VOVA might take the NSX version as a configuration parameter and install the correct corresponding OVS version. Let’s do it manually for now.
Login via SSH to the VOVA host and use the default credentials with the username root and the password vmware.
Ensure that you have the NSX OVS for Ubuntu package available on VOVA that matches your NSX version. For me the file nsx-ovs-2.0.0-build30176-ubuntu_precise_amd64.tar is the correct one.
Next extract the OVS Tar archive into a folder:
root@openstack:/tmp/ovs# ls
nsx-ovs-2.0.0-build30176-ubuntu_precise_amd64.tar
root@openstack:/tmp/ovs# tar xvzf nsx-ovs-2.0.0-build30176-ubuntu_precise_amd64.tar
./
./openvswitch-datapath-dkms_2.0.0.30176_all.deb
./nicira-ovs-hypervisor-node_2.0.0.30176_all.deb
./openvswitch-switch_2.0.0.30176_amd64.deb
./nicira-flow-stats-exporter/
./nicira-flow-stats-exporter/nicira-flow-stats-exporter_4.0.0.28083_amd64.deb
./openvswitch-common_2.0.0.30176_amd64.deb
root@openstack:/tmp/ovs#
We will now install all packages within the created folder. The package nicira-flow-stats-exporter in the sub-folder with the same name is not needed here. We will therefore skip it.
Use the command dpkg -i *.deb to install all NSX OVS packages:
root@openstack:/tmp/ovs# dpkg -i *.deb
Selecting previously unselected package nicira-ovs-hypervisor-node.
(Reading database ... 98439 files and directories currently installed.)
Unpacking nicira-ovs-hypervisor-node (from nicira-ovs-hypervisor-node_2.0.0.30176_all.deb) ...
Selecting previously unselected package openvswitch-common.
Unpacking openvswitch-common (from openvswitch-common_2.0.0.30176_amd64.deb) ...
Selecting previously unselected package openvswitch-datapath-dkms.
Unpacking openvswitch-datapath-dkms (from openvswitch-datapath-dkms_2.0.0.30176_all.deb) ...
Selecting previously unselected package openvswitch-switch.
Unpacking openvswitch-switch (from openvswitch-switch_2.0.0.30176_amd64.deb) ...
Setting up openvswitch-common (2.0.0.30176) ...
Setting up openvswitch-datapath-dkms (2.0.0.30176) ...

Creating symlink /var/lib/dkms/openvswitch/2.0.0.30176/source ->
                 /usr/src/openvswitch-2.0.0.30176

DKMS: add completed.

Kernel preparation unnecessary for this kernel.  Skipping...

Building module:
cleaning build area....(bad exit status: 2)
./configure --with-linux='/lib/modules/3.5.0-45-generic/build' && make -C datapath/linux............
cleaning build area....(bad exit status: 2)

DKMS: build completed.

openvswitch:
Running module version sanity check.
 - Original module
 - Installation
   - Installing to /lib/modules/3.5.0-45-generic/updates/dkms/

depmod............

DKMS: install completed.
Processing triggers for man-db ...
Setting up openvswitch-switch (2.0.0.30176) ...
 * Inserting openvswitch module
 * /etc/openvswitch/conf.db does not exist
 * Creating empty database /etc/openvswitch/conf.db
 * Starting ovsdb-server
 * Configuring Open vSwitch system IDs
 * Starting ovs-vswitchd
 * Enabling remote OVSDB managers
Processing triggers for ureadahead ...
ureadahead will be reprofiled on next reboot
Setting up nicira-ovs-hypervisor-node (2.0.0.30176) ...
 * successfully generated self-signed certificates.
 * successfully created the integration bridge.
 * Starting ovs-l3d
root@openstack:/tmp/ovs#
Similar to the NSX appliances and the ESXi hosts, the next step registers the NSX vSwitch with the NSX controller. First use the command ovs-vsctl set-manager ssl:<IP address of a NSX controller node> to point the NSX vSwitch to the NSX controller. In the case of an NSX controller cluster you can specify any IP address of a cluster member.
root@openstack:/tmp/ovs# ovs-vsctl set-manager ssl:192.168.110.101
root@openstack:/tmp/ovs#
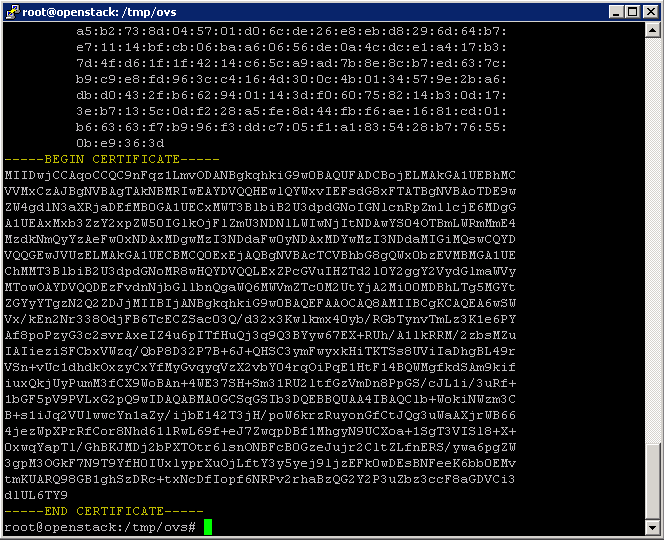
Next extract the SSL certificate from the NSX vSwitch with the command cat /etc/openvswitch/ovsclient-cert.pem.
Copy the text including the line ---BEGIN CERTIFICATE--- and ---END CERTIFICATE--- (See Figure 13). You will need this text in the next step.
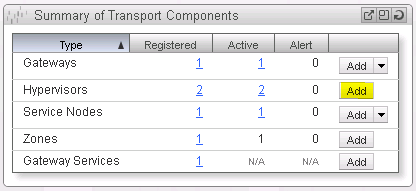
Return to the NSX Manager Dashboard. Within the Summary of Transport Components section, click on Add within the Hypervisor row (See Figure 14).
What follows now should look familiar from when you added the ESXi hosts as hypervisors to the NSX Manager in the previous post: “OpenStack with vSphere and NSX – Part 3: Install and configure the Open vSwitch inside the ESXi hosts”:
- Confirm that the pre-selected transport type is Hypervisor.
- Give the gateway node a name. I usually pick the hostname.
- As the Integration Bridge Id specify br-int. Leave the other values with the default setting.
- Select the Credential Type of Security Certificate and paste the previously copied certificate into the Security Certificate field.
- Create a transport connector for the NSX vSwitch using STT as the transport type and the IP address of your VOVA.
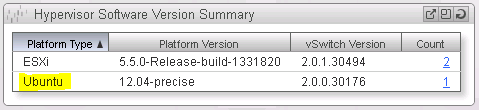
Return to the NSX Manager Dashboard, where you will see the new Hypervisor of type Ubuntu within the Hypervisor Software Version Summary section (See Figure 15).
Summary
Congratulations! This completes the installation of VOVA and NSX. Now you are ready to go and use your OpenStack cloud leveraging VMware vSphere – along with its well-known enterprise-class benefits such as VMotion – as the underlying Hypervisor as well as network virtualization provided via VMware NSX as a Neutron plugin.
Next in the series on OpenStack with vSphere and NSX is Part 5: “OpenStack with vSphere and NSX – Part 5: Create virtual networks and launch a VM instance in OpenStack” where we will take our new cloud for a quick spin and see what we can do with it, creating virtual networks within OpenStack that consist of L2 segments and interconnecting them via L3 to each other or the outside world. Also we will create our first VM instance via OpenStack.
Leave a comment