
Deploy WordPress with AWS OpsWorks
Notice: This article is more than 12 years old. It might be outdated.
AWS OpsWorks is an application management service that makes it easy for DevOps users to model and manage the entire application from load balancers to databases. It offers a very powerful solution for users to deploy their application easily in AWS without giving up control.
In this post I want to show you how easy it is to use AWS OpsWorks for deploying WordPress - a typical LAMP application. This includes deploying a fresh blank WordPress install as well as re-creating a WordPress site from a backup for Dev/Test or Disaster Recovery purposes. In all cases it should take you only a few minutes to have a running WordPress site.
While I use a Webhoster for running Edge Cloud, I do use the described approach to test changes to WordPress before deploying them into production. And I thereby also know that I could restore Edge Cloud as part of a Disaster Recovery (DR) plan via this approach.
About Opsworks
With the availability of AWS OpsWorks Amazon Web Services now has a number of different Application Management Services that address the different needs of Administrators and Developers (See Figure 1).
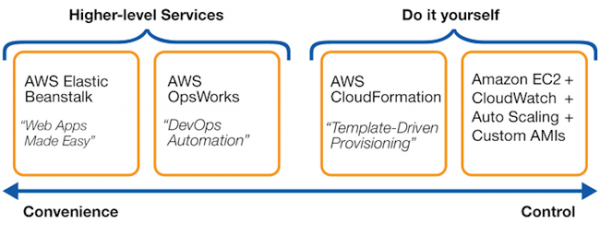
- AWS Elastic Beanstalk is an easy-to-use solution for building web apps and web services with popular application containers such as Java, PHP, Python, Ruby and .NET. You upload your code and Elastic Beanstalk automatically does the rest. Elastic Beanstalk supports the most common web architectures, application containers, and frameworks.
- AWS OpsWorks is a powerful end-to-end solution that gives you an easy way to manage applications of nearly any scale and complexity without sacrificing control. You model, customize, and automate the entire application throughout its lifecycle. OpsWorks provides integrated experiences for IT administrators and ops-minded developers who want a high degree of productivity and control over operations.
- AWS CloudFormation is a building block service that enables customers to provision and manage almost any AWS resource via a domain specific language. You define JSON templates and use them to provision and manage AWS resources, operating systems and application code. CloudFormation focuses on providing foundational capabilities for the full breadth of AWS, without prescribing a particular model for development and operations.
Use case
The goal for this post will be to use AWS OpsWorks to deploy a WordPress site, automating as much of the deployment as possible. We will include two distinct use cases:
- Fresh blank site: Create a fresh blank WordPress site that you can use to start hosting your own blog.
- Re-Created site from an existing backup: If you have an existing WordPress site, you can use a WordPress Backup Plugin, such as BackWPup. Using AWS OpsWorks will allow you to recover your WordPress site from a backup as a Dev/Test site. This way you can e.g. test installing a new plugin before doing so in the production site. But you can also use the recovered WordPress site for a disaster recovery scenario in case your primary site is hard down. The benefit here is that the recovery can happen almost entirely automated, which is always a good idea for a DR solution.
Even though we will run the WordPress site in AWS, we will not make use of AWS cloud concepts in order to achieve high availability for coping with AWS failures. Instead we will keep it very simple (See Figure 2).
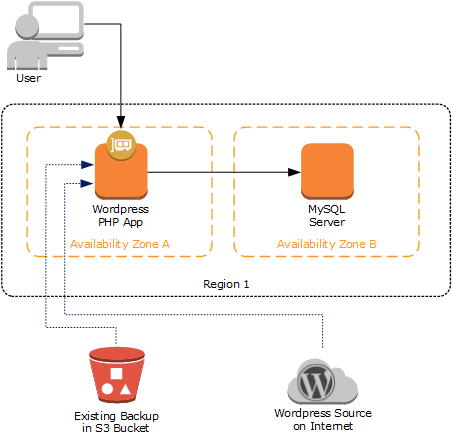
The deployed architecture will include:
- WordPress PHP App: An EC2 server running Ubuntu Linux with an Apache webserver to host the WordPress PHP application. End-users will be able to access the site via an Elastic IP, which guarantees that the IP address - or an associated DNS entry - will remain in place, even if the environment is rebuild.
- MySQL Server: An EC2 server running Ubuntu Linux with MySQL. MySQL will host the database for the WordPress application.
- Existing Backup (Optional): A full backup of an existing WordPress site as a Zip file in a S3 bucket.
- WordPress source code (Optional): The WordPress source code - available at www.wordpress.org for a fresh install of WordPress.
Getting Started with AWS OpsWorks
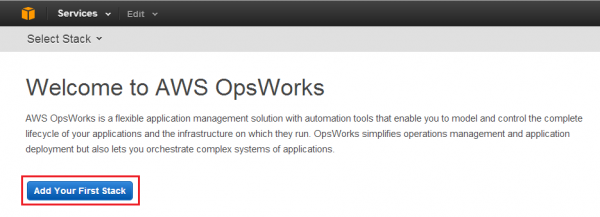
Let’s head over to the AWS OpsWorks console at console.aws.amazon.com/opsworks to get started. Login with your existing AWS credentials. AWS OpsWorks itself is a global service and you therefore do not need to pick a region at this point.
Creating a service or application in AWS OpsWorks includes 4 steps (See Figure 3):
- Add a stack: Define a stack for an application which includes information about e.g. the AWS region. You can have multiple stacks in various regions.
- Add layers: Each stack consist of one or more layers, with each layer having a certain function. Here we will use a PHP App Server layer and a MySQL database layer.
- Add an app: Define the application to be run via a source code repository or file bundle. This includes the ability to use Github and Subversion, a simple Zip file via a HTTP or HTTPS URL or a ZIP file in a S3 bucket.
- Deploy and manage: Deploy the application by starting the layer’s instances. Manage further capabilities such as deploying another application version at runtime.

Add a stack
First we will deploy a new stack, which will correspond to the WordPress application. AWS Opsworks also lets you clone an existing stack, which provides capabilities for additional interesting use cases.
Within the AWS OpsWorks console click on Add Your First Stack (See Figure 4).
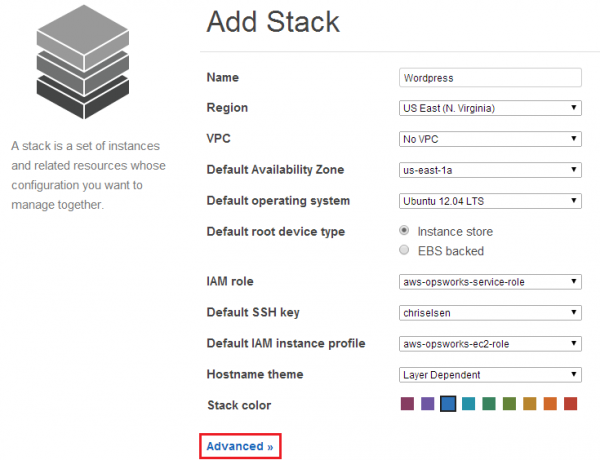
Next configure the basic information of your new stack. Give it a useful Name such as WordPress and select your Region. Select your preferred Default Operating System. Personally I prefer Ubuntu over Amazon Linux. If you want to login to the created EC2 instances via SSH, make sure to select a valid Default SSH key. All other settings you can leave as is for now. Click on the Advanced link at the bottom of the page for further configuration options.
AWS OpsWorks uses the configuration management tool Chef to configure the EC2 instances within each layer. For this it provides so-called Chef “recipes” that describe how server applications (such as Apache or MySQL) are managed and how they are to be configured. These recipes describe a series of resources that should be in a particular state: packages that should be installed, services that should be running, or files that should be written.
While AWS OpsWorks provides many useful recipes out of the box we want to add a few minor custom recipes. In particular we will use two custom recipes which can be found at https://github.com/chriselsen/opsworks-cookbooks:
- AWS-Ubuntu: Configure an AWS Opsworks Ubuntu image with a swap space. This is aimed at t1.micro instances to prevent “out of memory” issues.
- WordPress: Configure WordPress via the wp-config.php file to interact with the MySQL server. It can be used for a fresh install or a restore from a Backup using BackWPup. The wp-config.php will be filled with the IP address and credentials to access the MySQL server.
You don’t need to understand or even recreate these recipes. I have provided them in a form that allows you to directly use them yourself.
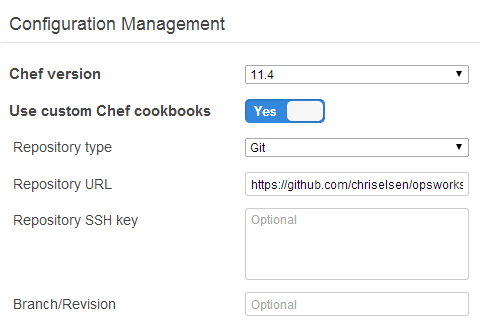
Within the Configuration Management section make sure the selected Chef version is 11.4 and that Use custom Chef cookbooks is selected with Yes. Specify the Repository type with Git and the Repository URL with https://github.com/chriselsen/opsworks-cookbooks.git (See Figure 6).
Next we want to perform some tuning for the components as we will be using the t1.micro instance later on.
The two things to tune will be:
- WWW Document Root permission: We want to change the www document root permission to the default user www-data under Ubuntu.
- Apache Prefork and Keepalive tuning: As we will be using the memory constraint EC2 flavor t1.micro, we want to make changes to the Apache Prefork and Keepalive settings to better adapt to this flavor type.
In AWS Opsworks the setup and configuration of Apache is performed by Chef recipes that use various parameters which can be controlled by the user via a simple JSON file. This way we don’t have to create a custom Chef recipe or even manually perform changes of our servers. Instead we can look up the apache2 attributes which are configurable and create a custom JSON file.
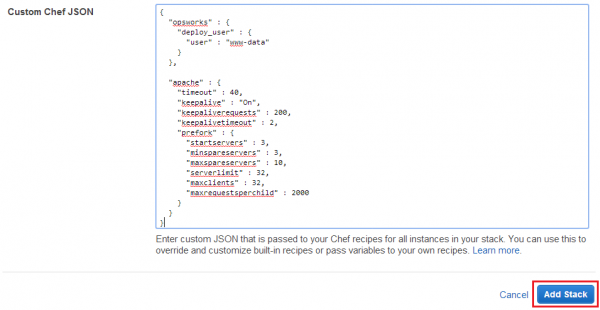
This JSON file will look as follows:
{
  "opsworks" : {
    "deploy_user" : {
      "user" : "www-data"
    }
  },

  "apache" : {
    "timeout" : 40,
    "keepalive" : "On",
    "keepaliverequests" : 200,
    "keepalivetimeout" : 2,
    "prefork" : {
      "startservers" : 3,
      "minspareservers" : 3,
      "maxspareservers" : 10,
      "serverlimit" : 32,
      "maxclients" : 32,
      "maxrequestsperchild" : 2000
    }
  }
}
Paste above Chef JSON code into the Custom Chef JSON field. Then click on Add Stack to finalize the creation of the stack (See Figure 7).
This completes the creation of the stack.
Add Layers
Next is the creation of the application stack layers. One for the PHP App Server layer and one for the MySQL database layer. Let’s start with the PHP App Server layer.
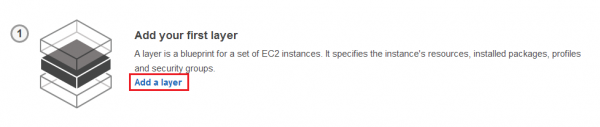
After you finished creating the Stack you’ll end up on the Stack tab. There under the Add your first layer section click on Add a layer (See Figure 8).
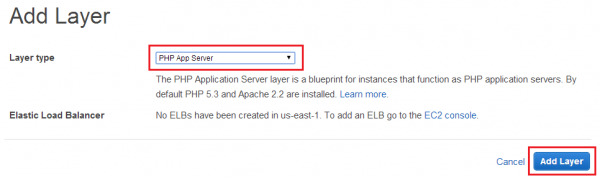
As the Layer type select PHP App Server and click on Add Layer (See Figure 9).
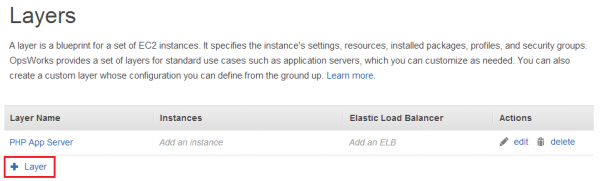
You will see your first layer successfully created. Click on + Layer to create the next layer (See Figure 10).
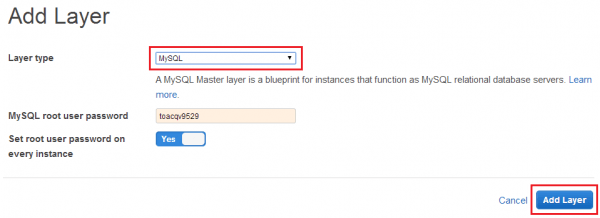
As the Layer type select MySQL. If you later want to manually connect to the MySQL server - e.g. for troubleshooting - note down the automatically created MySQL root password. Next click on Add Layer (See Figure 11).
We are almost done with the layers. We only need to perform some minor changes on the PHP App Server layer. Therefore in the PHP App Server layer row under Actions click on Edit (See Figure 12).

Although we have already pointed AWS OpsWorks to our custom Chef cookbooks, we still need to assign the individual recipes to the correct layer and lifecycle event. In AWS OpsWorks a layer has a sequence of five lifecycle events, each of which has an associated set of recipes that are specific to the layer. When an event occurs on a layer’s instance, AWS OpsWorks automatically runs the appropriate set of recipes.
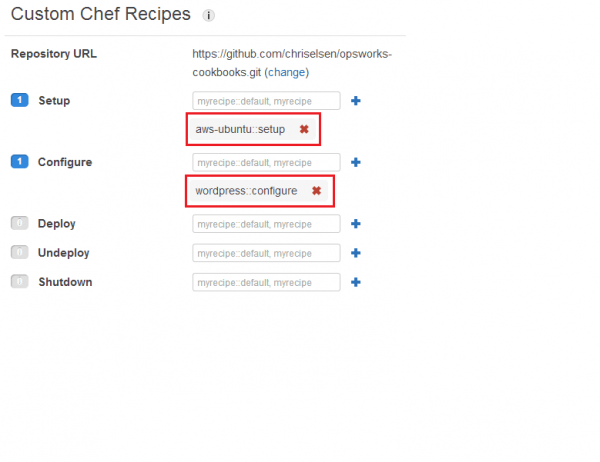
For the PHP App Server layer we need to define the following two recipes to lifecycle events (See Figure 13).
- Setup lifecycle event: Recipe aws-ubuntu::setup
- Configure lifecycle event: Recipe wordpress::configure
Next scroll down to the Automatically Assign IP Addresses section and set Elastic IP addresses to Yes (See Figure 14).
This assigns a so-called elastic IP address to the PHP App Server EC2 instance, an IP address that remains available even if the concrete EC instance is later replaced. It therefore allows you to place a DNS record on this Elastic IP address.

Scroll down to the Auto Healing section and make sure that Auto healing enabled is set to No (See Figure 15). As we will be using EC2 t1.micro instances, these instances can generate a very high load and/or memory usage - especially at boot time. With auto healing enabled it is possible that AWS OpsWorks interprets this as an issue and attempts to rectify it by recreating the corresponding EC2 instance. Therefore with this simple setup it’s safer to leave this turned off.

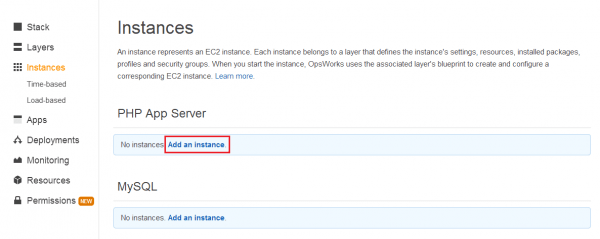
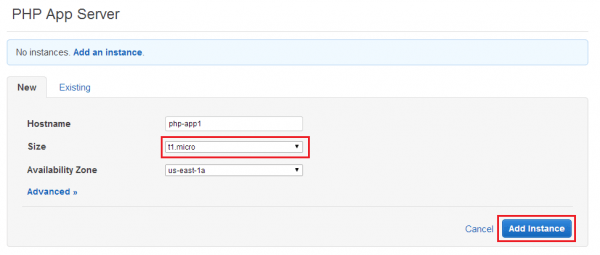
Next we need to create EC2 instances, one instance per layer in our case. Start with the PHP App Server layer and select Add an instance (See Figure 16).
As the Size select t1.micro and click on Add instance (See Figure 17).
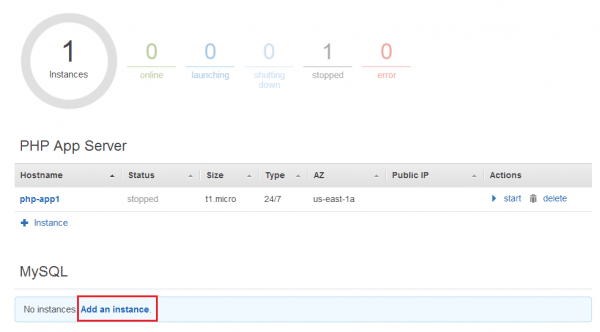
Now for the MySQL Server layer select Add an instance (See Figure 18).
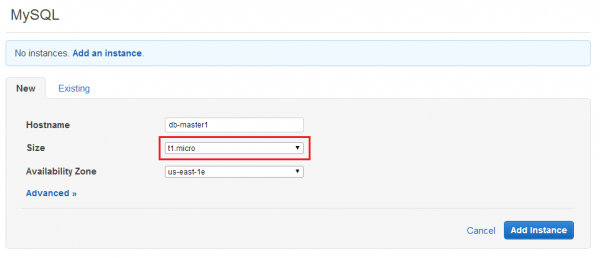
As the Size select t1.micro and select the same or a different Availability Zone depending on your preference. Click on Add instance (See Figure 19).
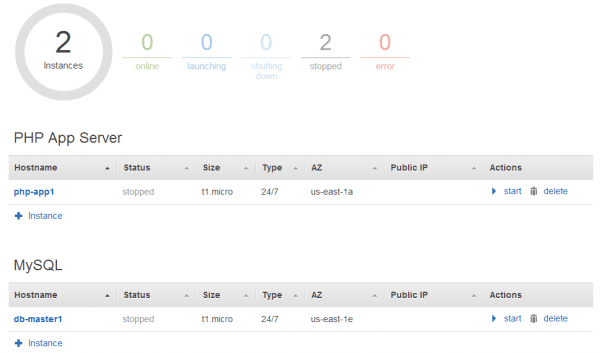
Notice that each layer now has one EC2 instance associated. At this point both instances are still in the Stopped state (See Figure 20). Before we can power them on, we need to define the actual application that is being run.
Add an App
Next we need to tell AWS OpsWorks which application to run on our stack. This is done by pointing to a source code repository or file bundle. Supported repositories include Github and Subversion. The bundles can be a simple Zip file via a HTTP or HTTPS URL or a ZIP file in a S3 bucket.
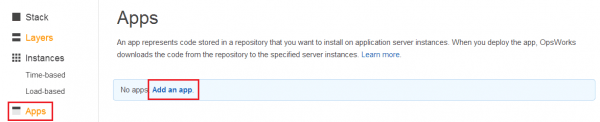
Navigate to the Apps tab and click on Add an app (See Figure 21).
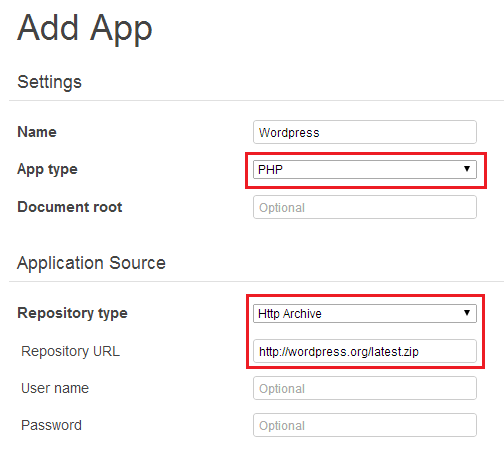
For the case of installing a fresh blank WordPress install you can therefore choose the Repository type to be Http archive and use for the Repository URL the URL http://wordpress.org/latest.zip (See Figure 22). This will allow you to install the latest version of WordPress.
In case you want to restore a backup from the WordPress Backup Plugin BackWPup, you can use Amazon S3 to store the backup files. This will allow you to directly specify this backup file in S3 here. When using BackWPup include the MySQL database as a Zip file inside the Backup file. The Chef recipe for WordPress mentioned above will then automatically import the database dump file back into MySQL.
This completes the configuration of the app, but also the layers and stack itself. Your new WordPress application is now ready for deployment.
Deploy your stack
So far we have not created any EC2 instance yet, but only defined Meta data in AWS OpsWorks. In order to actually use the WordPress application, we need to deploy it by starting the layer instances.
Return to the Instances tab and click on Start All Instances (See Figure 23). This will create, boot and configure all instances in all layers. It can take up to 10 minutes for the operation to complete. Therefore please be patient.

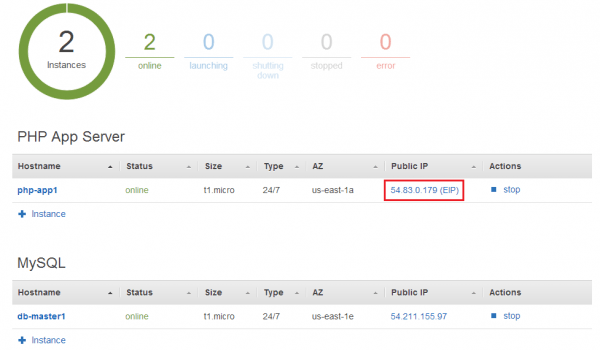
Once the instances are fully deployed, you’ll see the instances to move from the stopped state to the online state. Look up the IP address for the instance in the PHP App Server layer. This IP address should be marked with EIP for Elastic IP (See Figure 24). This is the IP address under which your WordPress installation will be available.
Connect with your favorite Web Browser to the IP address that you retrieved in the previous step. Or create a DNS name and connect to the DNS name. You will see your WordPress ready to be used (See Figure 25).
In case of a fresh blank install you start with the basic configuration of the site via the WordPress web interface. If on the other side you re-created the site from a backup, you should find the site running as it was during the backup run.

This completes this guide on using AWS OpsWorks to deploy a fresh blank WordPress install or to recover as WordPress site as part of a Dev/Test or Disaster Recovery (DR) use case.
Shutdown and Redeploy
You can shutdown instances and restart them if you want to take a break in your work and keep working where you left off.
But in the case you want to keep the stack for disaster recovery purposes, you want the instances to be rebuild with the latest version of your application and database during the recovery. Therefore you will want to discard the EC2 instances while keeping the Elastic IP address.
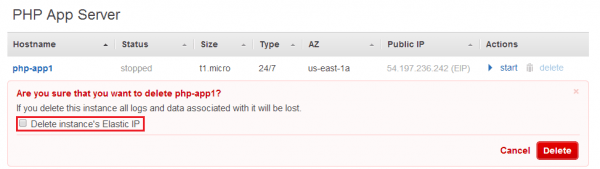
Therefore first power down all layer instances. Then delete the PHP App Server instance. Make sure to untick the box for Delete Instance’s Elastic IP for the PHP App Server instance (See Figure 26). This way you can reuse the Elastic IP address when you spin up new instances again.
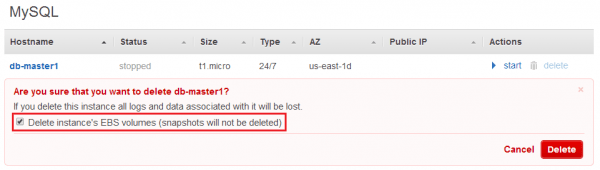
Next delete the MySQL instance. Here select Delete instance’s EBS volumes to delete the current database content (See Figure 27). The database content will be restored as part of the restore process from the backup in the S3 bucket.
Now recreate the instances as described above.
References
If you want to find out more about AWS OpsWorks, have a look at the AWS re:Invent 2013 presentation Zero to Sixty: AWS OpsWorks (DMG202) or the excellent AWS OpsWorks Documentation.
Leave a comment