
Use a Cisco WLC based Wifi with the CloudTrax captive portal
Notice: This article is more than 9 years old. It might be outdated.
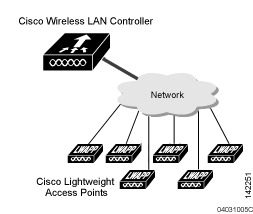
The Cisco Wireless LAN Controller (WLC) solution provides 802.11 wireless networking solutions for enterprises and service providers via a combination of a central wireless LAN controllers and associated lightweight access points controlled by the controller, all concurrently managed by any or all of the operating system user interfaces.
The solution simplifies deploying and managing large-scale wireless LANs by managing all data client, communications, and system administration functions, performing radio resource management (RRM) functions, managing system-wide mobility policies, and coordinating all security functions (See Figure 1).
Despite these outstanding capabilities, Cisco’s WLC brings rather limited and complicated capabilities to the table when it comes to creating a simple captive portal for Wifi users, where authentication of valid customers is performed via voucher codes.
Here Open-Mesh with it’s cloud-based CloudTrax controller offers a very simple and cost-effective solution to deploy a Wifi network - e.g. within a hotel, restaurant, college campus or other location - for users to authenticate via a Captive Portal for free, with a free or prepaid voucher or via PayPal payment (See Figure 2).

But if you already made a large financial and time investment into your Cisco WLC based Wifi network you do not necessarily want to rip and replace this network with an Open-Mesh network. Instead you might want to use the best of both worlds: The rock solid Cisco hardware with the easy to use CloudTrax captive portal. In this article I’ll show you how to do exactly this.
Existing Cisco WLC network
With Cisco WLC a service set identifier (SSID) is mapped to a VLAN within a port. As shown in Figure 3, each controller port connection is an 802.1Q trunk and should be configured as such on the neighbor switch. As an alternative you can also use the untagged VLAN within the WLC, thus not requiring a 802.1Q on the neighbor switch side. But in this case only a single SSID can be configured. As we want to provide a single public SSID with a CloudTrax backed captive portal, this setup would be sufficient.

Open-Mesh physical setup
The Cisco WLC does not directly support interacting with the CloudTrax-based Captive Portal. This capability is restricted to Open-Mesh based devices. In order to make a Cisco WLC based WiFi network work with CloudTrax, the solution is to place an Open-Mesh device - e.g. the OM2P - between the Cisco WLC based WiFi network an the internet (See Figure 4).
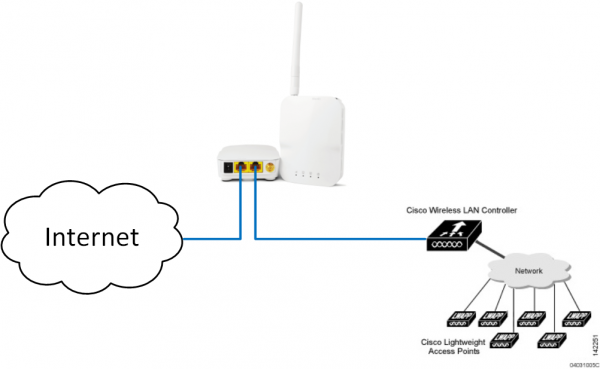
Make sure to plug the internet uplink into the port closest to the power plug and the Cisco WLC to the other port. Also keep in mind that not all Open-Mesh devices come with a second ethernet port. The Open-Mesh OM2P does and is therefore the recommended device for this project.
From the perspective of the Cisco WLC, the OM2P just acts like an upstream switch and from the perspective of the OM2P the Cisco WLC just appears to be a wired device.
Keep in mind that the OM2P does not support an 802.1Q trunk towards the WLC. You therefore either have to use the native VLAN capability on the WLC when connecting it directly to the OM2P. Or you have to place a switch that does support an 802.1Q trunk between the WLC and the OM2P. In this case the VLAN from the 802.1Q trunk towards the WLC needs to be mapped to an access port towards the OM2P.
CloudTrax Online Dashboard Configuration
Please refer to the CloudTrax documentation at https://www.cloudtrax.com/ for the quick start guide and documentation on how to use the splash page. Below are the configuration items that need to be changed for CloudTrax to work with the WLC:
Public SSID settings tab
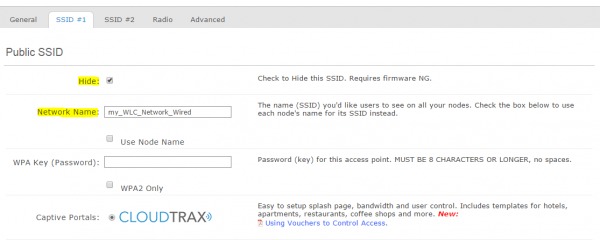
You don’t actually want to use the Open-Mesh device to provide any wireless capabilities. This should all be handled by the Cisco WLC-based network. Unfortunately it is not possible to turn off the wireless capabilities on an Open-Mesh device completely. Instead we will need to make some configuration changes to make the wireless network on the Open-Mesh device as inaccessible as possible. First, choose an SSID that does not correspond to the SSID that is configured in the Cisco WLC for the public accessible network and also hide this SSID (See Figure 5). Bottom-line: You don’t want clients to connect to the Open-Mesh device, but to the Cisco WLC network.
Private SSID settings tab
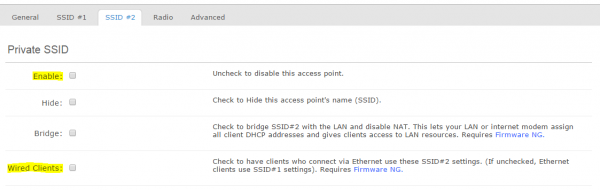
Similar for the private SSID. You do not actually want to provide this network via the Open-Mesh device. Therefore turn it off completely. But also make sure that the “Wired Clients” tick box is not selected (See Figure 6). This way the Cisco WLC based network will be mapped to the public network in CloudTrax and can use the captive portal.
Radio settings tab
Next reduce the transmit power of the Open-Mesh device to the minimum available (See Figure 7). This will reduce the likelihood that devices can connect to the Open-Mesh device over the wireless network. Instead they will connect over the Cisco WLC network.

You can also remove the antenna from the Open-Mesh device to further reduce the likelihood of a device connecting over the wireless interface to that device. But doing so will burn out the wireless chip of the Open-Mesh device over time. This approach is therefore not advisable if you plan on using this Open-Mesh device as a WiFi unit in the future.
CloudTrax scripting
Unfortunately we are not done yet at this point. We need to add a custom script on the Open-Mesh device, so that it can handle the static IP address of the WLC device. We also need to configure the WLC with such a static address for the network issued by the Open-Mesh device.
First connect to the Open-Mesh device via SSH and lookup the IP address information used for the public SSID via the command “ifconfig br-pub”. The result should look like this:
root@N3:~# ifconfig br-pub
br-pub    Link encap:Ethernet  HWaddr AC:86:12:34:56:78
          inet addr:10.255.48.1  Bcast:10.255.51.255  Mask:255.255.252.0
          UP BROADCAST RUNNING MULTICAST  MTU:1500  Metric:1
          RX packets:2379186 errors:0 dropped:306 overruns:0 frame:0
          TX packets:1812674 errors:0 dropped:0 overruns:0 carrier:0
          collisions:0 txqueuelen:0
          RX bytes:178505478 (170.2 MiB)  TX bytes:2171022384 (2.0 GiB)

root@N3:~#
Note that in this case the public SSID network operated by Open-Mesh is 10.255.48.0 with a netmask of 255.255.252.0 and the Open-Mesh device itself will operate at 10.255.48.1.
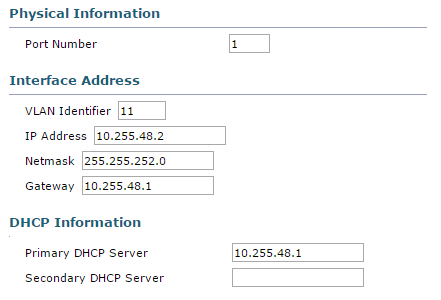
With these information we can now configure the Cisco WLC device to be at 10.255.48.2 (See Figure 8). Note that both the Gateway and the Primary DHCP Server are filled with the IP address of the Open-Mesh device.
Next create the file /sbin/wlc inside the Open-Mesh device with the following content. Replace the IP address 10.255.48.2 with the IP address that corresponds to the WLC in your setup.
#!/bin/sh
echo "Checking for WLC"
ping -c3 10.255.48.2 > /dev/null 2>&1 || {
        ifconfig br-lan2 down
        ifconfig br-pub down
        brctl delif br-lan2 eth1
        brctl addif br-pub eth1
        ifconfig br-pub up
        ifconfig br-lan2 up
}
This script will test connectivity to the WLC and if this test fails, re-configure the network interfaces on the Open-Mesh device. This script should run regularly, as configuration changes pushed from CloudTrax can undo any changes. This can be accomplished by creating a symbolic link from /sbin/wlc to /etc/cron.5mins/wlc with the command ln -s /sbin/wlc /etc/cron.5mins/wlc.
Check your results with:
root@N3:~# ls -l /etc/cron.5mins/wlc
lrwxrwxrwx    1 root     root             9 Dec 29 22:41 /etc/cron.5mins/wlc -> /sbin/wlc
root@N3:~#
Results
After a maximum of 5 minutes you should be able to connect to the Cisco WLC-provided SSID and receive an IP address on the above mentioned network. Upon opening a web browser and connecting to any web-page you will be displayed with the captive portal, where you can login via a free or prepaid voucher.
The client device will connect to the lightweight Cisco access point that is managed via the WLC. When asking for an IPv4 address via DHCP, the WLC acts as a DHCP proxy with the Open-Mesh device being the actual DHCP server.
Keep in mind that all Internet traffic from the Cisco WLC based WiFi network will now traverse through the Open-Mesh device. This means that a high number of parallel user sessions on the WiFi network can cause a high CPU utilization on the Open-Mesh device.
Leave a comment