
Protecting your website with DNS-Based Authentication of Named Entities (DANE)
Notice: This article is more than 9 years old. It might be outdated.
How can your users be sure that your HTTPS protected web-site is really what it seems to be and is actually your site? Today your web browser trusts a list of about 60-to-100 Certificate Authorities (CA) and you trust these CAs to only issue a certificate for a web site to the rightful owner of that site. As previous incidents, such as the March 11th Comodo security incident and the DigiNotar SSL Certificate security breach in the summer of 2011 have shown, this trust is not always justified. But how can your users verify that the X.509 certificate offered by your HTTPS server is indeed the certificate that should be used by this server and not a fake one used for a man-in-the middle attack against them?
This is where DNS-based Authentication of Named Entities (DANE) comes into the picture, adding another layer of security by tying the X.509 certificate of a website to the Domain Name System (DNS). This way you are adding a second independent channel which provides information about your X.509 certificate that a user can use to verify the rightfulness of this certificate.
Background
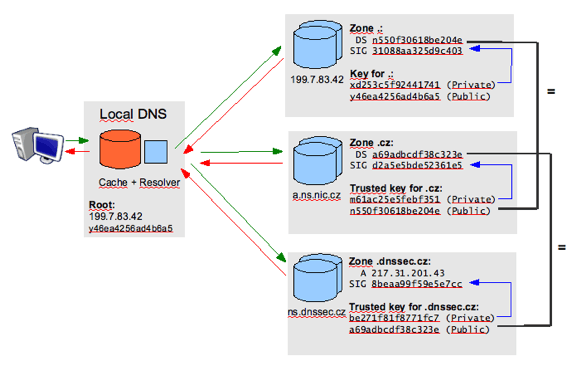
DNS-based Authentication of Named Entities (DANE, RFC6698) allow X.509 certificates, commonly used for Transport Layer Security (TLS), to be bound to DNS names using Domain Name System Security Extensions (DNSSEC). DNSSEC assures users that the information you obtain from DNS - in this case the fingerprint of the X.509 certificate came from the correct source, was complete and its integrity was not compromised during the transfer. All answers from DNSSEC protected zones are digitally signed. By checking the digital signature, a DNS resolver is able to check if the information is identical (i.e. unmodified and complete) to the information published by the zone owner and served on an authoritative DNS server (See Figure 1). Refer to How DNSSEC works from NIC.CZ for more information.
Today TLS encryption is based on certificates signed by certificate authorities (CAs), allowing users to trust such a signed certificate. Unfortunately many CA provider have suffered major security breaches in recent years, allowing the issuance of certificates for well-known domains to those who don’t own those domains. Users trusting such a compromised CA could thereby be fooled to trust rogue sites impersonating as such well-known domains.
DANE enables the administrator of a domain name to certify the certificates of the domain’s TLS servers by storing their fingerprint in the Domain Name System (DNS). In order to provide end-to-end security, DANE needs DNS records to be signed with DNSSEC to prevent DNS cache poisoning attacks. TLS servers that can be certified include e.g. HTTPS servers for secure web traffic but also SMTPS servers for secure mail exchange. Postfix e.g. introduced DANE support, allowing to further secure an SMTP connection.
Hands-On
In the rest of the article, I will show you how you can setup DANE for your own website and protect your users from Man-in-the-Middle attacks. For this the following items are needed as a pre-requisite:
- A secured website using HTTPS: I will use a dummy website www.examples.com hosted on an NGINX webserver. Numerous instructions already exist on how to setup an HTTPS server with NGINX or Apache.
- A Domain that supports DNSSEC: Today the majority of top level domains (TLD) support DNSSEC, but unfortunately not all do. A domain within such a TLD also has to be registered with a provider that supports placing DS records into the root zone. I will use a .com domain registered with GoDaddy as an example.
- A DNS authoratative Server that supports DNSSEC and DANE: ISC BIND 9.9.1-P3 and newer supports TLSA records necessary for DANE and also DNSSEC. If you don’t want to go through the hassles of hosting your own DNS server, you can use a hosted DNS Service. I will use the hosted authoritative DNS Service Rage4. To my knowledge it is the only DNS Service that supports DNSSEC and DANE records at this time.
With the above elements in place let’s get started.
Registering a domain in Rage4
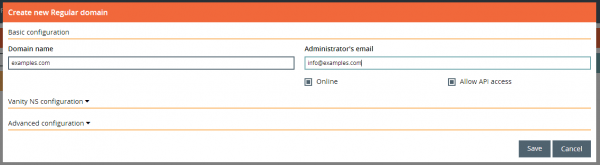
We will first start by registering a new domain in Rage4. Sign in or Register with Rage4 at https://secure.rage4.com. Create a new regular domain and fill out at least the Domain name and Administrator’s email. Confirm with a click on Save (See Figure 2).
Enter the Rage4 nameserver as the nameserver for your domain. You will have to do this with your registrar. In the case of GoDaddy you will find a row called Nameserver under the Domain Settings section of your domain. It will take between a few minutes and hours until the changes become visible in DNS.
Enabling DNSSEC
Next we will enable DNSSEC for this domain. Rage4 not only provides hosted authoritative name services with a global footprint and based on Anycast, but also hosted DNSSEC capabilities, taking care of the entire lifecycle for the digital certificates utilized in the hosted zone. You only have to manually place the DS record into the parent zone. For this we will later use GoDaddy. This makes dealing with DNSSEC super simple.
Click on Manage within the domains row to manage the newly created domain (See Figure 3).

You will notice that by default DNSSEC is turned off for a newly created domain. Turn it on with a click on DNSSEC ON (See Figure 4).

Verify that DNSSEC has been turned on for the domain and click on DNSSEC INFO to retrieve DNSSEC information for the created domain (See Figure 5).

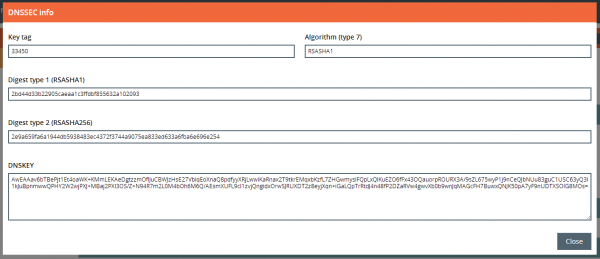
Rage4 will display the content for the DS record that needs to be placed into the .com parent zone. We will need the value of the Key tag, Digest type 1, and Digest type 2 fields (See Figure 6). We will not need the actual DNSSEC key.
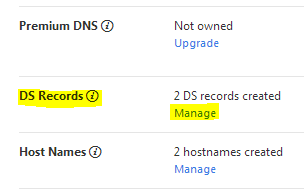
Next head over to GoDaddy where you manage your domain. Within the Domain Settings area of your domain find the DS Records row. Click on Manage (See Figure 7).
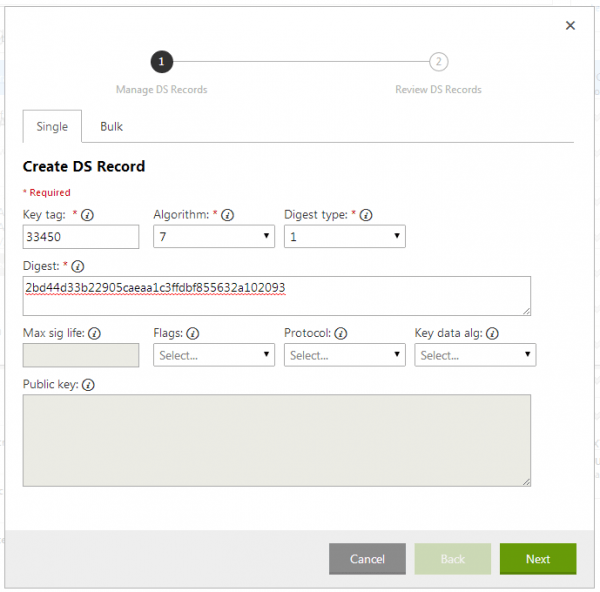
You need to create 2 DS records. One of Digest Type 1 and one of Digest Type 2. Start with Digest Type 1.
Copy the Key tag value from the Rage4 DNSSEC Info page and paste it into the Key tag field. As Algorithm select 7 and as Digest type select 1. Last copy the Digest type 1 value from the Rage4 DNSSEC Info page and paste it into the Digest field (See Figure 8). Save the record.
Next create the Digest Type 2 record. Copy the Key tag value from the Rage4 DNSSEC Info page and paste it into the Key tag field. As Algorithm select 7 and as Digest type select 2. Last copy the Digest type 2 value from the Rage4 DNSSEC Info page and paste it into the Digest field (See Figure 9). Save the record.

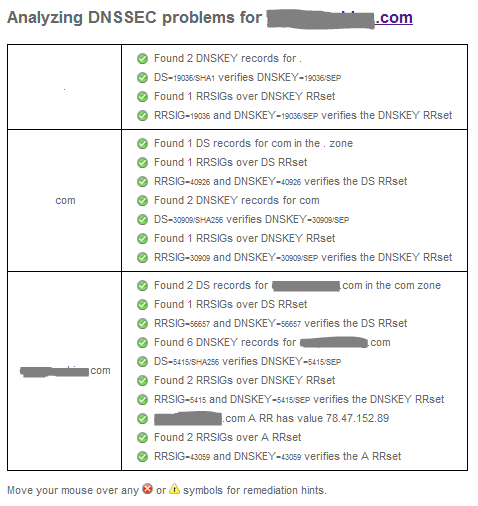
It can take several minutes until the DS record has been updated in the .com zone. You can validate that your DNSSEC has been setup correctly via the Verisign Labs DNSSEC Analyzer. It will show you the trust chain from the ”.” zone, over the com zone to your own zone. If everything has been setup correctly you should see every single line with a green check mark (See Figure 10).
See how easy it was to setup DNSSEC with Rage4?! With that one would hope that more domains were leveraging DNSSEC.
Create records for the HTTPS server
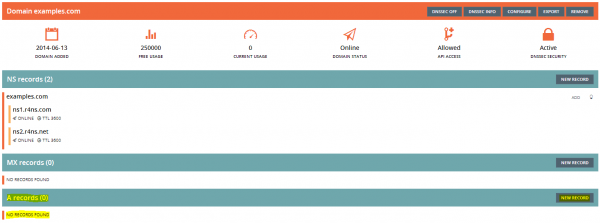
Now that DNSSEC is successfully working for the domain, it is time to create one or more A records for the HTTPS server, resolving e.g. https://www.examples.com and https://examples.com to an IPv4 address. If your HTTPS server supports IPv6, you can also create AAAA records.
Within the A records section click on NEW RECORD (See Figure 11).
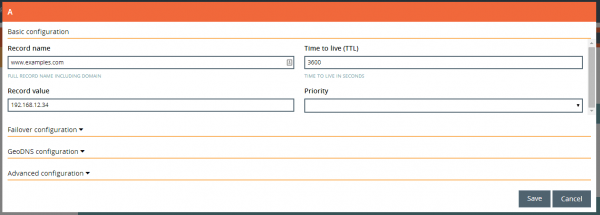
Enter the Record name and the Record value (IP address) for your HTTPS webserver. Save the entry with a click on Save (See Figure 12).
Generate and save TLSA record
DANE uses a so-called TLSA record, which includes the fingerprint of the X.509 certificate that protects a host. First we will need to generate this TLSA record based on our webserver’s public certificate. Then this TLSA record will need to be added to our DNS zone.
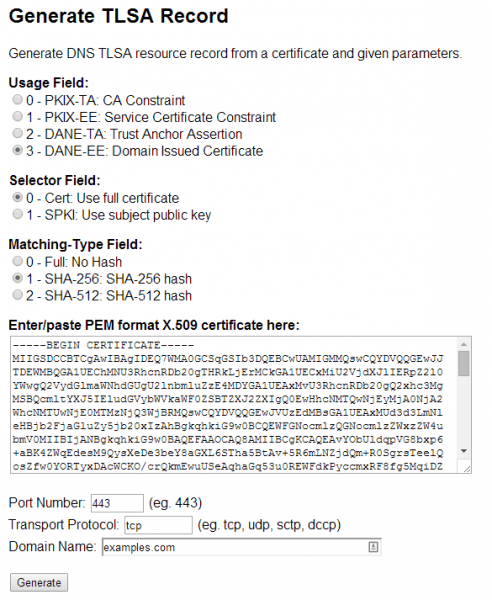
For generating the TLSA record, we will use the TLSA Record generator from Shumon Huque.
Leave the Usage Field, Selector Field, and Matching-Type Field at the default settings. Next paste the public certificate of your website’s X.509 certificate in PEM format into the form. As the Port Number enter 443 and as the Transport Protocol enter tcp. As the domain name enter your domain, e.g. examples.com. Click on Generate to create your TLSA entry (See Figure 13).
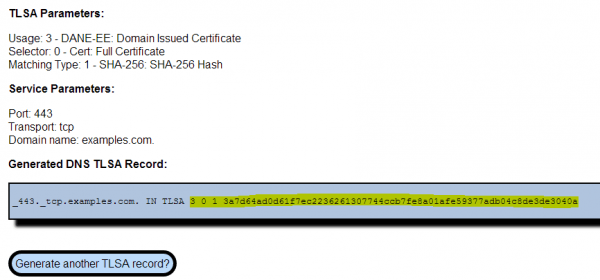
The generated TLSA record could be used directly with a modern version of ISC BIND. But as we are using Rage4, only the portion highlighted in yellow is of interest to us (See Figure 14).
Unfortnately Rage4 doesn’t support adding TLSA records to a domain via the Web GUI yet. TLSA records are an experimental feature and are only supported via the API. We therefore need to use a REST client against Rage4’s API to complete this step. I will show you how to do this via the Advanced REST client for Chrome. But any other REST client should work as well in a similar way.
Note: In the meantime Rage4 has added support for TSLA records via their Web GUI. Instead of using the API you can therefore now create the entry via the Web GUI.
Before we can get started you need to lookup the zone ID for your domain. You can find this numeric 5 digit value as the last part of the URL while in the Manage view of your domain in the Rage4 Web GUI. In this example I’ll assume that this zone IS is 12345
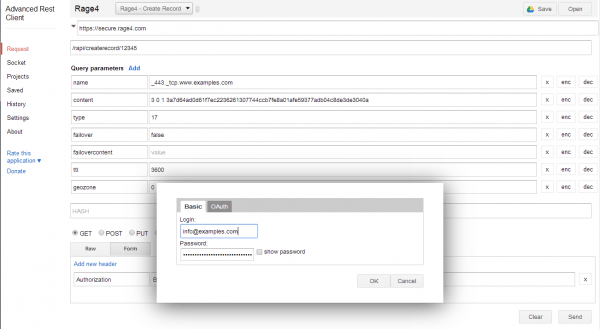
With this the API endpoint is https://secure.rage4.com/rapi/createrecord/12345 and the method is GET.
You will need to pass the following Query parameters:
- name: The value _443._tcp.www.examples.com or _443._tcp.examples.com with your domain instead of examples.com. You will want to create both entries in separate API calls.
- content: The value from the TLSA generator highlighted in yellow (See Figure 14).
- type: The number 17 for TLSA.
- failover: The value false.
- failovercontent: Leave the value field blank.
- ttl: Use the default value of 3600.
- geozone: Use the default value for global.
Also make sure to configure Basic Auth with your Rage4 username as the username and your API key as the password. Execute the API call (See Figure 15).
Verify the success of your API call by querying the DNS system for the created entry. This will either be _443._tcp.www.examples.com or _443._tcp.examples.com. Use the command dig along with type52 for the TLSA record type:
root@srv01 ~ # dig type52 \_443.\_tcp.examples.com

; <<>> DiG 9.9.5-3-Ubuntu <<>> type52 \_443.\_tcp.examples.com
;; global options: +cmd
;; Got answer:
;; ->>HEADER<
Congratulations! Your HTTPS web server is now protected via DANE. Don’t forgot to update the TLSA record in DNS in case you replace the X.509 certificate of your website.
Validating DANE protected sites
Protecting a HTTPS web site via DANE will be pointless unless the user verifies the data presented by the TLS connection with the data present in DNS. In the previous step you have already seen how to look up the certificate fingerprint stored in DNS via dig. In the above example the fingerprint is 3A7D64AD0D61F7EC2236261307744CCB7FE8A01AFE59377ADB04C8DE3DE3040A.
Using OpenSSL it is also possible to extract the fingerprint of the X.509 certificate use by a HTTPS server:
root@srv01 ~ # echo -n | openssl s_client -connect www.examples.com:443 | sed -ne '/-BEGIN CERTIFICATE-/,/-END CERTIFICATE-/p' > /tmp/dane.txt
depth=0 C = US, CN = www.examples.com, emailAddress = info@examples.com
verify error:num=20:unable to get local issuer certificate
DONE
root@srv01 ~ # openssl x509 -noout -fingerprint -sha256 < /tmp/dane.txt | tr -d :
SHA256 Fingerprint=3A7D64AD0D61F7EC2236261307744CCB7FE8A01AFE59377ADB04C8DE3DE3040A
As you can see the fingerprint obtained by DNS and by the HTTPS connection match. This is excellent news as it shows us that we are actually talking to the correct server.
Of course it is unrealistic that users would perform this manual lookup every time before connecting to an HTTPS website. Instead we would expect that browsers do this lookup out of the box and warn the user in case of a mismatch. Unfortunately none of the modern browsers has this capability built-in. But luckily NIC.CZ provides this capability as a plugin for most modern browsers at https://www.dnssec-validator.cz/.
With the TSLA validator plugin installed you will now be able to identify whether a visited HTTPS website is protected via DANE and whether the validation of the TSLA record via DNSSEC succeeded or not (See Figure 16).
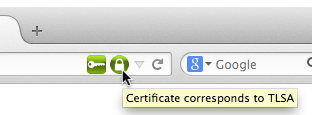
In this example the green closed lock symbol indicates that the X.509 certificate has been successfully validated via DANE.
Securing this blog with DANE
I would love to secure this blog with DANE in order to make the web a more secure place. Unfortunately I’m not able to do so as I use CloudFlare to deliver this blog. Doing so I’m forced to use CloudFlare as DNS service, which unfortunately neither supports DNSSEC nor TSLA records.
This is a shame as it would be super simple for CloudFlare to implement DNSSEC in a similar way to Rage4, thereby almost entirely Hands-Off for end-users. But as CloudFlare also manages the X.509 certificates for their customers, it would be possible to generate the TSLA records “automagically”. The result would be an extremely simple way to secure your HTTPS website with DANE via CloudFlare. Given CloudFlare’s footprint among major websites, this in return would hopefully put pressure on the Browser vendors to include DANE checking and lead to a much safer Internet.
Leave a comment